Preparations for Making Water Rockets part 1
This chapter will introduce the terminology for water rockets, as well as materials, tools and equipment needed to make the water rocket body and launcher.
Terminology for the water rocket
 |
| Terminology for the water rocket |
Download Photo
Terminology for the launcher
 |
| Terminology for the launcher |
 |
| Launch gear :Hand-made device to launch the water rock-et It is made by attaching a ready-made join-ter (to set the nozzle onto) to a break bar of a bicycle. |
Materials needed to make the water rocket and launcher
Essential materials and tools
Materials needed to build one rocket
2 PET bottles (for carbonated drinks).
Get two PET bottles that have been emptied, cleaned and dried, and had their labels removed. One bottle will be used for the rocket body, and the other to make the nose cone. While it is usually advisable to use 1.5-liter round (cylindrical) bottles, smaller 500-milliliter bottles can also be used. However, the PET bottles must be for carbonated drinks, as these can withstand greater pressure than bottles used for non-carbonated drinks. Bottles must also be smooth and free from damage. When launching your rocket, the air pressure should not exceed 7 atmospheres. For the sake of safety, we recommend 4~5 atmospheres. Technically speaking, only the bottle from which the rocket body will be fashioned needs to be for carbonated drinks since the rocket body, and not the cone, will be put under pressure. The other bottle, used for the nose cone, can be for other types of drinks. However, to avoid confusion during the rocket building process, it is better to use two carbonated drink bottles.
 |
| 2 PET bottles (for carbonated drinks). |
PVC sheet (or any thin sheet of flexible yet sturdy plastic) 10cm ×20cm
 |
| To make fins, get a sheet of PVC that is 1~2mm in thickness. You can find these at your local do-it-yourself outlet. If PVC sheets are unavailable, you can substitute them with any type of thin, flexible yet sturdy plastic, such as writing boards made of poly-styrene. |
 |
| This is used to make the skirt. Available at your local stationery shop, etc. |
Modeling clay approx. 50g
 |
| Modeling clay is used as ballast. If you will be mak-ing several water rockets at one time – for example, as a school project – it is advisable to prepare a suitable number of individual lumps of clay before-hand, each weighing about 50g. |
Vinyl bag (as cushion: 45-liter capacity trash bag) 1 piece
 |
| A vinyl bag is put into the nose cone as a cushion to absorb the impact when the rocket returns to Earth. Please use one 45- to 70-liter vinyl garbage bag for each rocket. |
Vinyl tape
 |
| Vinyl tape is used to put parts and materials togeth-er. By offering an assortment of tapes of various col-ors, children can combine them to create their own colorful designs. |
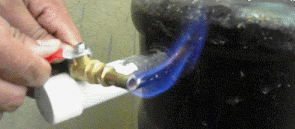
 |
| As a safety precaution, we strongly recommend the use of mass-produced nozzles. While it is possible to use a rubber stopper, you run the risk of the stop-per failing as air pressure increases; such unpre-dictability makes them a poor choice as far as safety is concerned. Commercially available nozzles also can be used repeatedly. |
Tools and equipment
While most of the cutting work can be done using a pair of common scissors, a cutter or specially designed pair of scissors with pointed tips is used to cut the nose cone from the second PET bottle. We advise you to take every precaution when handling these tools.
Scissors
 |
| The type of scissors as shown here is used for most of the cutting, such as for the fins, skirt and nose cone. Special PET bottle scissors are also available. | | | | |
Cutter
 |
| A cutter is used when making the nose cone. You are tasked with explaining to the children the proper way to hold the cutter, how to handle other tools, and other safety precautions to ensure that risk of injury is reduced to a minimum. |
Cutter mat
 |
| When using the cutter, students should be given a mat to protect their desks. |
Plywood
If you will be making the rockets in a classroom, gymnasium or other similar location you might choose to place a piece of plywood on each stu-dent’s desk or on the floor to prevent damage to the desk or wood floor.
Permanent marker
A permanent marker is used to draw cut guidelines and names on PET bottles. The use of various color markers can enhance enjoyment of the building process as they allow your students to illustrate their rocket bodies.
Materials, tools and equipment needed build the launcher
The launcher we describe in this manual is simple to make and uses materials and tools encountered in your daily life. The launcher is designed to be adjustable, allowing you to adjust the launch angle as desired.
- Wood slabs: 2 types each for the guide rail and base sections These wooden slabs constitute the core sections of the launcher. Strong and durable materials like waterproof plywood are recommended.
- Square wooden rods: 4 pieces These square rods are used as guide rails.
Used to connect the wooden slabs for the base section.
- Hooks and hetons: 2 pieces each
Used to connect the guide rail section to the base section.
- Protractor, kite string, weight
Used to make the mechanism to determine the launch angle.
Used to fix the launch angle.
- Nails, adhesive agent, vinyl tape
- Oil-based varnish for application to wooden materials
Since the launcher we are going to make is made of wood, we coat its entire surface with var-nish to protect against water damage.
Tools and equipment
- Hammer
- Saw
- Wood adhesive
- Pencil
Rocket flow chart: from building to launch
 |
| Rocket flow chart: from building to launch |
Making Your Water Rocket
Note:Project by Prof. Nobuaki Ishii Institute of Space and Astronautical Science Japan Aerospace Exploration Agency
Source: http://paksc.org/pk/diy-projects/item/872-making-of-water-rocket.html


 Water Rocket[/caption]
Water rockets are easy to make and use materials found in daily life. Children will be thrilled, and their creativity stimulated, watching their hand-made rockets soar skyward to unexpected heights. Water rockets that perform well have good science behind them. Similarly, behind every failure is a scientific concept that has been violated.So it is essential that children understand the fundamentals of water rockets. Water rockets have much in common with real rockets, allowing children to experience the same excitement that rocket engineers do. Several key points must be remembered if your students are to succeed in making water rockets that fly high, straight and safely – and enjoy themselves in the process. Targeting teachers and instructors, this project is designed to explain not only how to make water rockets, but also provide them with all the essentials required to make technically sound craft. In other words, this project offers teachers and instructors the means with which to instruct children as to the key points to bear in mind when making safe, high-performance water rockets. This project also contains tips regarding the motivations and aspirations children should be encouraged to entertain, and abilities within each child that can be developed. We sincerely hope this project and the accompanying Video will help you to develop educational programs that allow your children to learn the basics of water rockets and develop their activities as mini rocket engineers buoyed by dreams of flight yet dedicated to safety.
Water Rocket[/caption]
Water rockets are easy to make and use materials found in daily life. Children will be thrilled, and their creativity stimulated, watching their hand-made rockets soar skyward to unexpected heights. Water rockets that perform well have good science behind them. Similarly, behind every failure is a scientific concept that has been violated.So it is essential that children understand the fundamentals of water rockets. Water rockets have much in common with real rockets, allowing children to experience the same excitement that rocket engineers do. Several key points must be remembered if your students are to succeed in making water rockets that fly high, straight and safely – and enjoy themselves in the process. Targeting teachers and instructors, this project is designed to explain not only how to make water rockets, but also provide them with all the essentials required to make technically sound craft. In other words, this project offers teachers and instructors the means with which to instruct children as to the key points to bear in mind when making safe, high-performance water rockets. This project also contains tips regarding the motivations and aspirations children should be encouraged to entertain, and abilities within each child that can be developed. We sincerely hope this project and the accompanying Video will help you to develop educational programs that allow your children to learn the basics of water rockets and develop their activities as mini rocket engineers buoyed by dreams of flight yet dedicated to safety.