Share

Tuesday 24 January 2012

rocket ballon

Rocket balloon 
Material:
  1. Balloon
  2. Plastic straw
  3. Thread
  4. Cello tape
final assembly
slip a plastic straw in a thread
Add hold thread tightly
source:http://www.arvindguptatoys.com/

SUDARSHAN CHAKRA

   SUDARSHAN CHAKRA
   SUDARSHAN CHAKRA


Cut two sticks from a broomstick - one long 15 cm and the other short 6-cm. Tie the sticks tightly with a string as shown in the drawing. Poke a hole in the rubber cap of an injection bottle, or else, in the eraser from your geometry box. Insert the rubber cap in the long broomstick. Now place the joint of the sticks on your right hand index finger and rotate the assembly as shown. You will be surprised to see that the sticks rotate around your finger like a Sudarshan Chakra without falling. As a matter of fact, the faster you rotate the sticks, the more stable and balanced is the assembly.  This simple toy will give children a good feel for Centrifugal and Centripetal force.

Source:http://www.arvindguptatoys.com

Thursday 19 January 2012

DIY Anaerobic Digester Science Fair Projects

DIY Anaerobic Digester Science Fair Projects
     
     
                       Concept The purpose of this project is to discover ways to produce Biogas with alternate sources by using our local resources this project can help students to basics of Anaerobic digestion and production of bio-gas by different organic wastage, basic task is to design, fabricate, and test a simple waste digester and gas collection system.With this system you can examine various facets of the anaerobic digestion process. Background Information What is biogas? Biogas, known as a sour ce of renewable energy, is made mostly of methane. (60-70%) Biogas, as known by many scientific as sociations and universities, is made from…more

Read more: http://paksc.org/pk/

Make Your Own Voltaic cell


Level Elementary, Secondary


We can make an electric cell by using easy available materials. Let’s try it.

Concept

It is Alessandro Volta in Italy who invented the battery for the first time in 1800. That used the zinc and copper plate in the dilute sulfuric acid. This electric cell is a prototype of a dry battery today. Let's make the voltaic cell.


Materials
glass cup or glass bottle, diluted sulphuric acid (battery liquid), zinc plate, copper plate, conducting wire, clip, light emitting diode (LED), and hydrogen peroxide solution

Procedure

  1. The zinc plate and the copper plate are put in the glass cup.
  2. Diluted sulfuric acid is put.
  3. The zinc plate and the copper plate are connected to the conducting wire. Because the voltage is low in one, it connects in series by two
    or more.
  4. It is connected to LED. The bubble of hydrogen attach to the surface of the copper plate soon. It becomes the insulator and the electric current is getting weaker. The bubble can be taken by putting the hydrogen peroxide solution and the current revives.

Science

Volta discovered the ionization tendency while advancing this research.Ionization series to water is below.

Li, K, Ca, Na, Mg, Al, Zn, Fe, Ni, Sn, Pb, (H), Cu, Hg, Ag, Pt, Au

In the voltaic cell, the metal which becomes ion easier than hydrogen is used for n

egative pole. And the metal which is more difficult to become ion than hydrogen is used positive pole.In this battery, zinc melts to sulfuric acid and it becomes a zinc ion.The electron is left for the electrode at this time. This electron flows in the conducting wire and reaches the copper plate. The electron is
given to the hydrogen ion here, and the hydrogen gas is produced.


Questions

Q: Let’s make sure that each combination will make electric current or not.
Source: Chemistry Experiments 

Deoxidation of carbon dioxide

Deoxidation of carbon dioxide

Concept 

When an organic compound burns, carbon dioxide is produced. The property of the carbon dioxide is no combustion. It is used for the gas of extinguisher. Most materials are extinguished in the carbon dioxide gas.
However, magnesium takes oxygen from carbon dioxide and burns. Students are learning that  materials don't burn in carbon dioxide. It could be surpri se for students there is a material that can burn in carbon dioxide.   The concept of oxidation can be easily understood in the usual combustion. Not only oxidation but also eoxidation can be studied  in this experiment.

Materials 
limestone, dilute hydrochloric acid, magnesium ribbon, PET bottle, straw, clay, water, glass vessel, and deflagating spoon

Procedure 
  1. The hole is made in the cap of the PET bottle. The straw is passed through this hole.Surroundings of the hole are shielded with clay.  
  2. The limestone is crushed to the sma ll pieces and is put in the PET bottle. Put some dilute hydrochloric acid and carbon dioxide is produced.
  3. A little water is put in the glass vessel.Carbon dioxide is poured in the glass vessel.The mouth of the glass vessel is covered with paper.  
  4. A small piece of magnesium ribbon is tied to the deflagating spoon. The magnesium ribbon is ignited. Magnesium is put in the carbon dioxide of the glass vessel.   

Science 

Deoxidation of carbon dioxide
The carbon deoxized from carbon dioxide is produced a little in  this reaction.You should carefully obse rve it in the water of the glass vessel. There  are tiny black spots of carbon and the white ash of magnesium oxide in it.
Source: Chemistry Experiments

Wednesday 18 January 2012

Experiment Split flame

Experiment  Split flame
Combustion

Level Primary, Elementary


Concept 

   It is understood that heat is necessary for burning. It is understood that the candle and alcohol change into the gas by heat and burn.

Experiment  Split flame

Materials


candle, wire gauze (2), and match

Procedure 
  1. Heat is lost when the wire gauze is put in the flame of the candle and the paraffin gas  is not able to be burnt.
  2. It seems that the flame separates when another wire gauze is brought up and ignite the gas.
Source: Chemistry Experiments

Pocket body warmer Experiment Iron and sulphur

Pocket body warmer

Level Elementary

Concept 
   It is confirmed that heat is released in the chemical reaction by oxidization and sulphuration with iron powder.

Experiment  Iron and sulphur

Materials
iron powder, sulphur, mortar, pestle, thermometer, paper, and balance

Procedure 

  1. The iron powder 14g and the sulphur 8g are measured and taken.Put them in the mortar and mix.
  2. Water is put in by two and three drops, and the ball of iron filings and sulphur is made.
  3. The ball is wrapped with the paper, and the thermometer is inserted in the inside.
  4. The tucked ball with the paper is warmed by the palm.Warm it by the palm until the temperature   exceeds 40℃ You put on the desk
  5. afterwards, and observe it.
              heat
Fe + S    →  FeS


More Experiments and projects   

How to find out Oxygen ratio in air by Candle combustion


Water goes up the level 1/5.
How to find out Oxygen ratio in air by Candle combustion

Materials 

candle, glass vessel or PET bottle, match, plate, sodium hydroxide, and water

Procedure 

  1. The sodium hydroxide is dissolved in water and the solution of 3% is made.
  2. The candle is fixed in the plate.
  3. Light the candle.
  4. Cover it with the glass vessel or the PET bottle.
  5. Confirm the water level and the ratio of the volume.

Science 
When burning, the candle uses the oxygen in the air. The water made by burning reduce the volume about 1/1700 after cooling and becoming the liquid. As for remaining carbon dioxide, it reacts with the sodium hydroxide and the sodium carbonate is made. It is absorbed to the solution. Therefore, water which is almost same volume of the oxygen rises in the container.

More Experiments and projects   

How to find out Oxygen ratio in air


How to find out Oxygen ratio in air

Level Elementary

Concept
The ratio of oxygen in air is 1/5(21%). Let’s confirm it by simple experiments. by Iron rusting

Materials

steel wool, glass vessel or PET bottle, wire, plate and water

Procedure
  1. Make the wire support for the steel wool.
  2. The steel wool is dampened by water a little.
  3. The steel wool is put in the plate.
  4. Water is put in the plate.
  5. When the PET bottle is used, cut it in the form of a cylinder.
  6. Cover the steel wool with the glass vessel or the PET bottle.
  7. Leave it for half a day and confirm the water level and the ratio of the volume.


Science

The oxygen in air combines to iron and makes iron oxide. The gas oxygen is absorbed
in steel wool. Water enters in the container to the same amount of oxygen.

More Experiments and projects   

How to make Hydrogen bubble


How to make Hydrogen bubble
Experiment How to make Hydrogen bubble

Concept 
   The   hydrogen gas is lighter than the air. Let's experiment it by using soap bubbles.

Materials 

PET bottle, straw, clay, zinc, diluted hydrochloric acid, glass, and the liquid detergent

Procedure 

  1. The small hole is made in the cap of the PET  bottle. The straw is passed through the cap. Surrounding of the hole is sealed with clay. 
  2. The liquid detergent is thinned to 20 times by water and the soap bubble liquid is
        made. 
  3. Zinc and diluted hydrochloric acid are put in the PET bottle and the cap is done. 
  4. The straw end is put into the soap liquid. Soap bubbles swell, and these rise in the air. 
How to make Hydrogen bubble
More Experiments and projects 

How to findout Air’s mass

How to findout Air’s mass
Level Elementary

Experiment Air’s mass


Concept 

   The air has mass.Let's measure the air’s mass with a spray can and PET bottle.

Materials 
used spray can,  PET bottle (500ml or 1000ml), and air pump, vinyl  nozzle, adhesive tape,  pin for the ball, electronic balance or balance, bond, and water tank

Procedure 
  1. Confirm that there is no gas in the spray can. 
  2. The nozzle is attached to the spray can by the bond. 
  3. The adhesive tape is rolled in the pin for the ball. 
  4. The pin is inserted to another side of nozzle tightly. 
  5. The air is put into the spray can enough by the air pump. The spray button is pushed during pumping. 
  6. Measure the mass of the spray can by the balance. 
  7. Water is put in the water tank Water is put in the PET bottle, and it is set up inverted in the water tank. 
  8. The air 1000ml is taken from the spray can by replacing the water of the PET bottle. 
  9. Measure the mass of the spray can by the balance again. 
  10. The mass of the air 1000ml is calculated.

Working 

The following are one example of the measurement result. The mass of the spray can with air: 117.6g The mass of the can after taking out air1000ml : 116.4g As a result, the mass of air 1000ml (1dm ):1.2g    The mass of air 1dm  in 0℃  1atm is 1.293g. 

Question 

Let's calculate the mass of air in the classroom. 
The mass of the air 1dm3 is assumed to be 1.2g, and the height, width, and length of the classroom are assumed to be 3.5m, 7m, 10m each. 
The volume of the classroom=3.5 m ×7m× 10m=245m3 (meter cube)
1m 3=1000 dm3
The mass of air in the classroom=1.2 g×1000×245=294000g =294kg
Air’s mass Experiment
Air’s mass experiment

Build your own Hot Air Balloon

How To Make Hot Air Balloon

alt


Level Primary, Elementary

Concept

The gas inflates when it is heated. Let's make easy balloon by using this phenomenon.

Materials


garbage bag (thin, big one is good), enameled wire, tissue paper, sprit, adhesive tape, and match.

Fabrication

(1)The enameled wire is put on surroundings of the garbage bag with the adhesive tape.  
(2)Other enameled wires are put in four places as shown in figure.  
(3)Tissue paper is held to  the centre of wire and put sprit a little.  
(4)Top of the bag is held and the tissue paper is put on fire. Be careful not to fire the bag.  
(5)The bag inflates and goes up.

alt


Precaution

This experiment doesn't succeed at temperature high, summer time. Winter when the temperature is low is the best.   Please do in the windless place.

alt

Science


This experiment is simple. But students can make sure three phenomena when they
think why the balloon can go up in the air.
1. The movement of the gas molecules become faster at the high temperature. So the volume of gas grows. It is Charles' Law. Students can see the garbage bag inflation.

2. When the volume of the gas grows, the mass for each unit volume becomes small and the density becomes small.
3. Buoyancy of gas inside the bag beco
mes more than gravity when the density of in it is smaller than that of surrounding gas. And the balloon goes up.

alt


Application


The bag goes up for a while even if warm air is sent to the inside with the hair drier instead of using the fire.

How to make Bottle Tornado

Bottle Tornado


Tornadoes are formed when warm, moist air swirls together with cool, dry air. They are most often associated with storm clouds that contain vortexes — spirals of rising air. As the vortex sucks in the surrounding air, more air moves in at a high speed to fill the space.
1 Remove the labels from the bottles. Take the caps off each bottle and rinse the bottles thoroughly. Drill a 1/2 inch hole in the center of each cap. Kids should get an adult to help.
Tornado in a Bottle
2 Place the caps together on their flat ends, and put a thin bead of caulk around the hole to seal it. Let it dry. Wrap a piece of duct tape tightly around the outside of the caps to stick them together.


3 Screw the caps back on to one of the 2-liter bottles. Fill the other bottle about 3/4 full with water. You can add food coloring and confetti if you would like. The confetti and food color helps to see the force of the vortex.

4 Twist the empty bottle tightly to the top of the bottle filled with water. Hold the bottles by the duct-taped area with one hand and use the other to support the bottom of the bottle.

5 Turn the bottles upside-down and stir them in a circular motion. You should see a vortex that forms as the water drains into the bottle on the bottom.

Ammonia fountain

Ammonia fountain


Level Secondary


Concept

It is confirmed that ammonia dissolves into water very much. It is confirmed that the water solution of ammonia is base.


Materials

ammonia solution, test tube clamp, phenolphthalein, PET bottle or glass bottle with cap, injection syringes, straws, beakers, test tubes, spirit lamps, and rubber stopper.

Ammonia fountain

Experiment 1

Procedure

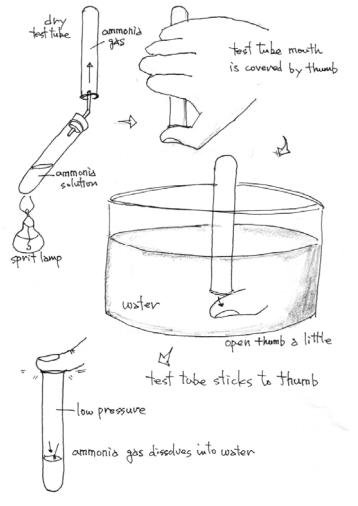
(1)The ammonia solution is put  in the test tube, and rubber stopper with a tube is on it.

(2)Mouth of a dry test tube  is faced downward and ammonia gas is collected. The mouth of the test tube is caped by the thumb.
(3)The thumb is opened a little in the beaker that puts water in.  


Science

Ammonia gas dissolves into water.  The inside pressure of test tube becomes small, and the finger is stuck quickly to the test tube.

Experiment 2


Fabrication

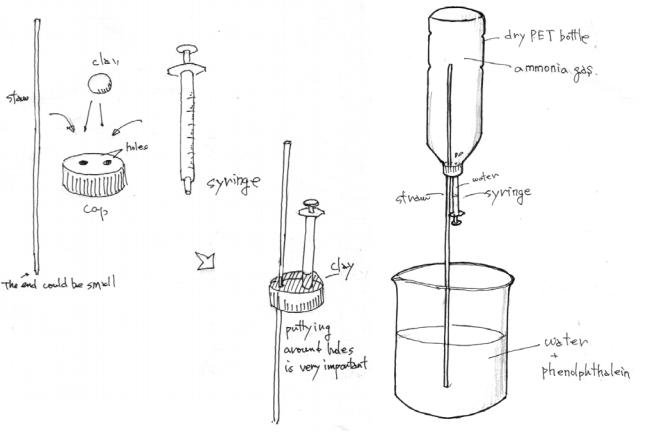
(1)Two holes are made for the cap of the bottle.
The straw is passed through one hole. The injection syringe has already been passed through the hole of the cap.
(2)Surroundings of the hole are shielded with clay carefully.


Working

(1)Put water in the injection syringe.
(2)Water is put in the beaker, and the phenolphthalein is put by several drops.  ammonia fountain diagram
(3)The mouth of a dry bottle faces downside and ammonia gas is collected inside of the bottle.
(4)The cap of the bottle is closed, and the end of straw put into the water of the beaker.
(5)The water of the injection syringe is put in the glass bottle.


Science

Because ammonia in the bottle  dissolves into water, and pressure becomes small, water is sucked up. 
As for water in the bottle, it becomes red because ammonia solution is base and reacts with the phenolphthalein.

More Experiments and projects  

Experiment Hydrogen and oxygen

Experiment Hydrogen and oxygen
 

Materials 

dry battery (1.5V), hydrogen peroxide, water tank, PET bottle (4), straw (4), dilute hydrochloric acid or diluted sulphuric acid, electric igniter  and plastic bag with zipper

Procedure 

 
  1. Four PET bottles that make the cap the hole and pass the straw are prepared.
  2. The manganese dioxide and the hydrogen peroxide are put in one PET bottle, and oxygen is collected in one PET bottle by the water substitution.
  3. The zinc plate and the dilute hydrochloric acid are put in another PET bottle, hydrogen is collected in the PET bottle by the water substitution. 
  4. Oxygen and hydrogen are quietly put into  the plastic bag with the zipper.
  5. The igniter is inserted in the plastic bag. Ignite it.  

Science 
It is confirmed that wate r is produced after it explodes in the plastic bag.   

Question 

If only hydrogen is into the plastic ba g and is ignited, what will happen?  Precaution Surroundings of the straw close with the zi pper well so that the gas should not leak. The explosion becomes big if a lot of oxyge n and hydrogen are put, and the bag breaks out. Because the produced water changed into steam, the gas putting in the bag should be a proper quantity.   
Experiment Hydrogen and oxygen

Experiment with Oxygen and Hydrogen

Oxygen and Hydrogen

Level Elementary

Concept

   Zinc and manganese dioxide can be taken out from the used dry battery. Oxygen and hydrogen are produced by using the acid, the hydrogen peroxide and the two materials of the dry battery. The property of oxygen and hydrogen is examined.

Working
Taking out zinc and manganese dioxide from the dry battery The dry battery is taken apart, and zinc on the surface and inside manganese dioxide, a carbon at the center, and an upper and lower iron plate are divided separately.

Experiment with Oxygen and Hydrogen tools

preparation of Oxygen

Materials 

dry battery (1.5V), dry battery (9V), hydrogen peroxide, water tank, PET bottle (2), straw, steel wool, spirit lamp, match,   deflagrating   spoon,   radio   pincers,   nippers,   and glass bottle

Procedure 
(1)The hole for the straw to the cap of the PET bottle is made.  Surroundings of the hole are closed with clay so that the gas should not leak here  through the straw.
(2)The water substitution is prepared by putting water in the water tank, and using the  PET bottle.
(3)The manganese dioxide and the hydrogen peroxide are put in the PET bottle, and the cap   with   the   straw is done.The produced oxygen should be collected in the PET bottle quickly. Because  the reaction will end in a short time, it is points.

Experiment with Oxygen
Experiment with Oxygen testing

Experiment 2

Preparation of Hydrogen 

Materials 

dry battery, dilute hydrochloric acid or dilute sulphuric acid , water tank, film case, test tube (2), match and nippers

 Procedure 

  1. The hole is made for th e cap of the film case
  2. The zinc plate is cut small by nippers
  3. The zinc plate and the dilu te hydrochloric acid are put in the film case and cap it. 
  4. If the vinegar is used for th e replacement of the dilute hydrochloric acid or diluted sulphuric acid, the hydroge n is produced slowly.
  5. The film case is put in the water tank. the produced hydrogen is collected in the test tube by the water substitution.
  6. The mouth of the test tube  is caped by using the thumb.
  7. The match's fire is brought close to the mouth of the test tube,  the thumb is opened, and the reaction is seen. 
  8. The reaction when half air is put in the test tube is examined, too.  

Question 

Why the difference of two reactions happens is discussed about.  
Preparation of Hydrogen diagram
Preparation of Hydrogen Testing

More Experiments and projects  

How to make Cotton candy


Concept 

When sugar is heated, it becomes a liquid caramel. If you continue to heat, the sugar burns out. When caramel is pushed out from tiny holes to the outside by using the centrifugal force, the cotton candy
can be made.   The cotton candy making machine can be made with easy available materials.

Materials 

tea strainer of metal, motor, wire, spirit lamp, pin, adhesive tape, rubber t ube, aluminum plate, dry battery, conducting wire, cardboard box, and crystallized sugar

Fabrication 

  1. Cut the aluminum plate as like the gear wheel for the tea strainer lid, and the hole for putting sugar is made, too.
  2. Bend two places on the tea strainer grip.
  3. The pin and the rubber tube are pu t up to the axis of the motor. 
  4. The connection of the motor and the tea strainer is made from the wire.
  5. The spirit lamp is put in the cardboard box and ignited.
  6. The crystallized sugar is  put in the tea strainer. 
  7.  The motor is connected to the dry battery after heating s ugar with the spirit lamp for a while. 
Cotton candy making
part of rotor
the joint of motor
Cotton candy making diagram

good Cotton candy making
Related Posts Plugin for WordPress, Blogger...