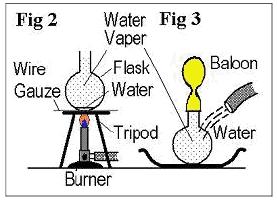
When water vapor in a frank is cooled and condensed into water drops, the pressure in the flask reduces greatly.
Introduction:
When water vapor changes into water drops,its volume reduces to less
than one thousandth.Using this principle, we can make a virtual vacuum
and let a balloon be sucked into a flask.
Materials:
a flask
a tripod
a balloon
a wire gauze
a Bunsen/alcohol burner
water
Construction
1. Put a little water in a flask. Place the flask on a wire gauze and heat it by Bunsen/alcohol burner until water vapor begins to come out as shown in Fig.2. 2. When there is almost no water in the flask, stop heating and cover the mouth of the flask with the mouth of balloon as shown in Fig.3. 3. Pour cold water around the bottom of the flask. 4. Observe what happens.
Science:
The volume of 1 mole water vapor at 100 ℃ is 30,600ml while that of 1
mole water at 100 ℃ is only 18ml. If we heat water until it comes to
boil, water vapor drives the air out of the flask. If we cool the flask
by pouring cold water around the flask after covering its mouth with a
balloon, water vapor in the flask is condensed into water drops and
there is little water vapor in the flask. So the pressure in the flask
also reduces greatly and the balloon is sucked into the flask.
Things to do:
1. Find the way how to restore the balloon to its former state.
2. Remove the shell of a boiled egg and prepare a bottle whose mouth
is a little smaller than the egg.Observe what happens, when you put a
burning match into the bottle and cover the mouth of the bottle with the
naked egg. And find the reason.
Simplest homemade electrical generator lights a LED or makes electricity by shaking magnets
Experiment Level: Secondary Class
Concept:
Induced electromotive force lights a LED.
Introduction:
A changing magnetic flux through a coil induces a current in the coil.
The phenomenon is called electromagnetic induction and it was discovered
by Michael Faraday in England in 1831. It is one of the most important
phenomena in physics and in practical use. It needs a galvanometer, a
strong magnet and a coil which has enough turns to demonstrate the
phenomenon to students. Sadly a galvanometer is a little expensive and
difficult to find. However a good demonstration of the phenomenon can be
done using strong bar magnet and a LED display instead of a
galvanometer.
Materials:
two red LED (transparent type)
a piece of plywood (size 7 cm×15 cm, thickness 5 mm)
wood base (7 cm×6 cm×1 cm)
2 brass screws
2 connecting wires (length 20 cm)
a coil (about 1000turns)]
strong bar magnet / ten ferrite magnets
a plastic pipe (diameter 25 mm, length 1 m)
two connecting wires with crocodile clips
Construction:
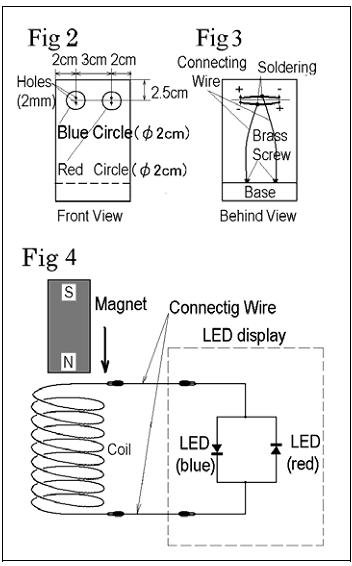
Draw a blue circle and a red circle on the plywood and make 4 holes for two LED as shown in Fig.2.
Attach the plywood to the wood base using wood glue and fix two brass screws on the base as shown in Fig.3.
Paint two LED blue and red using permanent markers.
Attach 2 LED to the holes of the plywood and wire them using soldering iron as shown in Fig.3.
Working:
Arrange the equipments as shown in Fig.4.
Put the coil on a table vertically and fill the bottom of the coil hole with tissue.
Put the plastic pipe on the top of the coil hole vertically.
Fall the bar magnet from the top of the plastic pipe.
One of the LED will be switched on.
Put the magnet upside down and try again. The other LED will be switched on.
Science:
In 1831, Michael Faraday discovered that an electromotive force is induced in a coil when the
magnetic flux passing through the coil increases or decreases. This
process is called electromagnetic induction. Faraday’s law says: The
magnitude of the induced electromotive force is proportional to the rate
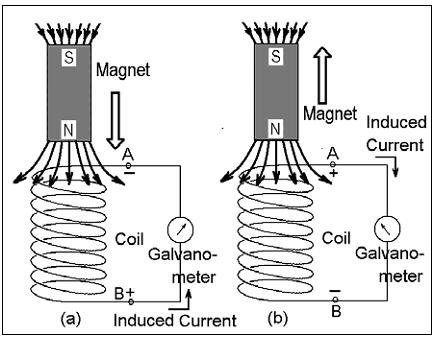
at which the magnetic flux passing through the coil changes. Lenz’s law says: The direction of the induced current is that it sets up a magnetic field that tends
to stop the cause producing it. As shown inFig.5, there is a coil and
its ends are connected to a galvanometer. (a) In the case that the north
pole of the bar magnet moves into the coil As the magnetic flux passing
through the coil is increasing, the current induced in the coil sets up
a magnetic field that decreases the flux. So, the induced current flows as shown in Fig.5 (a).
(b) In the case that the north pole of the bar magnet withdraws from
the coil as the magnetic flux passing through the coil is decreasing,
the current induced in the coil sets up a magnetic field that increases
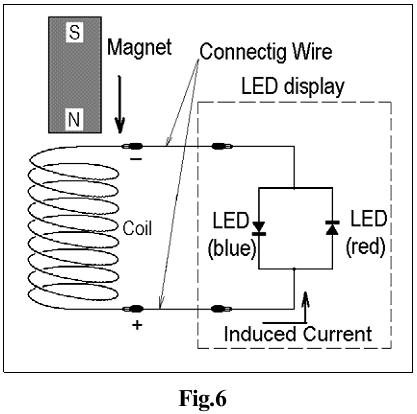
the flux. So, the induced current flows as shown in Fig.5 (b). When you
connect the LED display to the ends of the coil and fall a bar magnet
from 1m height as shown in Fig.6, what will happen? In this case, the
red LED will be switched on, because this case is same as that of Fig.5
(a).
Put the magnet upside down and try again. This time, the blue LED will be switched on.
Things to do:
1. Consider the reason why you must fall a magnet from high place. 2. Try to demonstrate the experiment using a galvanometer instead of the LED display.
Make a Handmade Spectroscope Measure a Light Wavelength!
Concept: Light is a kind of wave How Do You Measure a Light Wavelength?
Introduction:
As you know, light is a kind of electromagnetic waves and its
wavelength is 400 nm(Violet)~800nm(Red). T.Young measured the light
wavelength for the first time using interference of light by double
slits. But, we can measure the light wavelength more easily using a
diffraction grating. So let’s make a handmade spectroscope using a piece of replica grating in order to measure the light wavelength.
Materials:
(a) cardboard (size 25 cm×30 cm) (b) a piece of replica grating
(1000grooves/mm, size 2.5 cm×2.5 cm) Fig.1 Finished product (c) a black
permanent marker (d) a cutter/scissors (e) wood glue (f) sello
tape
Construction:
Draw the figures of parts A,B and C on the cardboard as shown in Fig.2.
Cut out parts A, B,C and paint the back side of them black using a black permanent marker.
Make two slits and a rectangular hole on parts A. Make a slit C on parts B (cursor).
Fold parts A along the dotted lines shown in Fig.2. Using wood glue, make a box whose inside is painted black as shown in Fig.3
Attach the replica grating film on the rectangular hole of the box from outside using sellotape as shown in Fig.3.
Using sellotape, attach parts C (cursor holder) to the box as shown in Fig.3.
Fold parts B(cursor) along the dotted centre line and insert it to the cursor holders.
Direct slit A to a light source with youreye in contact with the
replica grating and you can see a spectrum. Measure the light wavelength
by moving the cursor.( How to measure is written in the following page )
Science:
Light is a kind of wave. Diffraction and interference are the nature
of waves. Because of these two natures of light, we can see a spectrum
using a diffraction grating. As shown in Fig.4, when parallel light rays
come into a diffraction grating perpendicularly, they are diffracted by
the grooves of a diffraction grating. Diffractive rays whose
diffractive angle isθstrengthen each other by interference if
theysatisfy the following formula: dsinθ=mλwhere d=distance between
grooves,λ=wavelength,m=integer When these diffractive rays come into our
eyes, they appear as if theyare coming from Q. If the diffractive light
rays which satisfy the above formula are green, wecan see green in the
direction of Q.Next, I would like to describe how to measure the light
wavelength using this apparatus. When you contact the replica grating of
the apparatus to your eye and direct slit A to the light source, you
see the spectrum of the first order (m=1) as shown in Fig.5. If you want
to measure the wavelength of green light, you should move the cursor so
that the light from the hole of the cursor is just vertically above the
green belt of the spectrum. Then, measure x, the distance between slit A
and the hole of the cursor. If the depth of the apparatus isl, the
value of sinθis given by the following formula.
If the replica grating has 1000 grooves per millimeter, the value of
dis 1/1000 mm. Thus we can get the value of the wavelength using this
apparatus.
Things to do:
Using this apparatus, measure the light wavelengths of green line and violet line in the spectrum of a fluorescent light. (There are many mercury atoms in a fluorescent bulb. The spectrum of light emitted from atoms consists of many lines and it is called “Line Spectrum”)
How its work
when the motor rotates the magnets inside the coil rotate this produces EMF and lights up he LED's
Sourece :
http://www.arvindguptatoys.com/toys.html
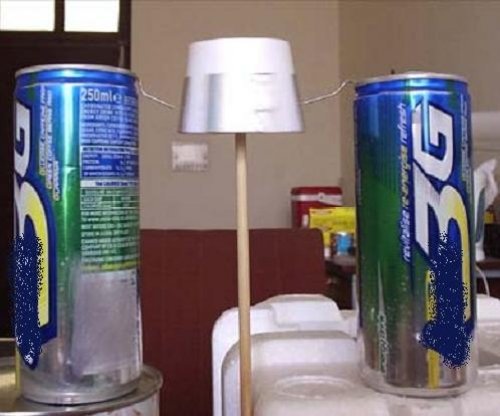
Build Simple Electrostatic Franklin's MotorPakistan Science club
Franklin motor
Materials
two aluminum cans,plastic cup, snap, pushpin, polystyrene foam board, styrene foam pillar,
aluminum foil, paper clip, adhesive tape, vinyl pipe, and kitchen paper
Construction
A hole is made at the center of the bottom of a plastic cup. Put the snap in the cup to make a bearing.
Eight pieces of aluminum foils are cut into 10×25mm pieces. Put them on the cup.
The pushpin is put on the tip of the styrene foam pillar. The pillar is bonded to the styrene foam board.
The paper clip is put on two aluminum cans by aluminum foil. The point of the clip makes it go out by 40-50mm.
HOW Simple Electrostatic Franklin's Motor WORKS:
When a high voltage is applied between the two stator cup foils, one
stator cup aquires a negative charge imbalance, while the other one
becomes positive. Also, a tiny spark jumps from the tip of each
commutator brush to one of the foil sectors on the rotor bottle. The
sector under the positive brush becomes positive, the one under the
negative brush becomes negative. The rotor's foil sectors are then
repelled from the alike-charged stator bottle and attracted to the
unlike charged stator cup. This sideways electrostatic force causes the
center bottle to rotate, which brings new foil sectors under the
brushes. Tiny sparks then jump to the new sectors and charge them, which
makes them attract/repel from the stator bottles, etc. The foil on the
rotor bottle that's under the commutator is always charged the same as
the commutator, so it's always being repelled/attracted sideways. The
force is continuous, therefor the speed of the rotor cup will keep
rising higher and higher. In practice the rotor speed will not increase
forever, but will stabilize because of air turbulence, bearing
resistance and bearing chatter, etc. If the entire motor could be put
inside a vacuum chamber, it would REALLY run fast. But then the sparks
couldn't jump from the commutator wires, and you'd have to arrange some
kind of sliding contact brushes instead. (Sparks cannot exist in vacuum,
since a spark is made of air which has turned into plasma.)
(Reference http://amasci.com/emotor/emot1.html)
How to Make a Soda Bottle Rocket. Houston, we have a bottle. Prepare for liftoff with
0:08
these simple steps. You will need 48" piece of 1/2-in. PVC pipe 2 2-liter soda bottles
0:16
Pencil Round metal file Rubber o-ring Drill 1/4" bit 1/2-in. end cap PVC cement 1/2-in.
0:29
PVC elbow Epoxy glue 1/4" hose barb mender Bicycle tire valve stem 1/4" inside diameter
0:39
vinyl tubing Hose clamp for 1/4-in. tubing 1-in. PVC collar 12-in. piece of 1-in. PVC
0:48
pipe Hacksaw 3 5/16" x 3" eyebolts Coat hanger 4 5' pieces of kite string Utility
0:59
knife Duct tape Thin sheets of balsa wood Partner 3 stakes Hammer Bicycle pump and craft
1:09
paint (optional). Children under 12 should not use the rocket without adult supervision.
1:16
Step 1. Push one end of the 1/2-inch pipe all the way in to one of the bottles. Pull
1:21
it out 1/4 inch, and trace the opening of the bottle on the PVC. Remove the bottle,
1:27
file a shallow groove in the pipe along the line, and slide the o-ring into the groove.
1:32
Step 2. Drill a 1/4-inch hole in the PVC end cap. Use PVC cement to fasten it into the
1:38
elbow, and epoxy the hose barb mender into the hole in the end cap. Then, glue the open
1:43
end of the elbow to the end of the PVC pipe opposite the o-ring. Step 3. Epoxy the threadless
1:51
side of the bicycle tire valve stem to one end of the vinyl tubing. Attach the other
1:56
end of the tubing to the hose barb using the hose clamp. Step 4. Glue the 1-inch PVC collar
2:02
to the 1-inch pipe. Use the hacksaw to cut two semi-circular notches around the collar
2:09
3/4-inch from the end. Make sure the ends of the notches are about an inch apart. Step
2:15
5. Drill three holes in the 1-inch collar around the end opposite the notches and screw
2:19
in the bolts about a half an inch. Step 6. With the hacksaw cut the bottom out of a wire
2:25
coat hanger. Bend the two remaining arms down so they're parallel and about an inch apart,
2:30
forming a narrow "U." Tie a piece of kite string to the hook. Step 7. Cut off the bottoms
2:36
of two 2-liter soda bottles and securely tape the open ends together. Keep the bottle cap
2:41
on one of them. Then create the balsa wood fins. Draw and cut out three parallelograms
2:47
with 5-inch sides and 4-inch ends and epoxy one of the long sides of them to the bottle
2:52
with no cap. Paint your rocket for a cool custom look. Step 8. Have a partner hold the
2:58
1/2-inch PVC upright so the elbow is on the ground. Slide the 1-inch PVC over the 1/2-inch
3:04
PVC so the collar is pointing up. Fill the rocket 1/3 full with water and slide it onto
3:09
the 1/2-inch pipe until the o-ring forms a seal with the bottle. Step 9. Lift the 1-inch
3:15
pipe until the collar is around the neck of the bottle. Then, put the coat hanger into
3:19
the notches on the collar so it catches on the bottleneck and holds the 1-inch pipe up.
3:24
Tighten the eyebolts to secure everything in place. Step 10. Tie the ends of each piece
3:29
of string to an eyebolt and a stake. Then, hammer the stakes into the ground to hold
3:34
the launch tube up. Step 11. Connect the pump to the valve stem and operate the pump to
3:39
pressurize the rocket. Pull the string attached to the coat hanger to release the rocket and
3:43
watch your creation soar! Did you know Michael Melvill made the first non-government funded
3:49
flight to space aboard SpaceShipOne in 2004.
An electromagnet is a type of magnet in which the magnetic field is produced by the electricity. This experiment about What is an electromagnet? How to make an Electromagnet? What Are Electromagnets Used For in Everyday Life?
This Project experiment video hosted by Fatima Rasheed she is Pakistan Science club's junior scientist she also host many videos like how to make simple telescope, how to make coin batteryhow to make tumble wing
( https://www.youtube.com/watch?v=XJuVdijAgVA ), tumble wings and solar cooker
What is Electromagnets
Electromagnets is a type of magnets which is magnetized by the help of electricity, it is a temporary magnet its magnetization removed with the disconnection of electric current. It is widely used in electronics devices such as motors, generators, relays loudspeakers, hard disk drive scientific instruments and magnetic separation process. In industries it is to lift and move heavy iron pieces or machinery.
Watch video (Link 1)
Video Link 2
Things required making
An iron nail
Few feet copper laminated coil 30 number gauge
Battery cell 9 volt
Paper pins
Lighter
Tape
How to make
First take an iron nail, grip it from pointed side, and leave two inch copper wire and start turning or winding it around the nail.
After giving more than 200 turns burn both ends of copper wire to remove its coating.
Bring the nail near paper pin it will not attract them but ends of the coil to the terminals of battery it will become an temporary magnet
How it works
There are many free electrons in a conductor or metals which randomly and freely move in whole conductor and their overall effect is neutral. When the electric current is pass throe it, they align than selves in two poles that is north and south temporarily but when their electric current is switch off they turn again demagnetized.