Share

Showing posts with label science fair project. Show all posts

Tuesday, 7 May 2013

How can sunlight produce electricity?


How can sunlight produce electricity?


Materials needed


  •  Solar cells
  •  Galvanometer
  • Light source

Procedure


1. In recent years scientists have been trying to find new sources of electricity to replace our rapidly diminishing fossil fuel resources (coal and oil). A most promising source is solar (sun) energy. Look at your solar cell. When light strikes this cell, a very small amount of electrical energy is produced.

2. Connect your cell to the galvanometer and shine a bright light on it. As you turn the light on and off, observe the needle on the galvanometer. What happens to the needle?

For problem solvers: if you can get some solar cells, learn how to connect them to operate a small light bulb. Perhaps you can find some discarded calculators and use the solar cells from them.

Do some research and see learn about what you can learn about solar energy as a source of electricity. Make a list of all of the things you can find that are powered by solar energy. Will it likely ever be a major source of electricity for our homes and factories?

Can solar energy be used as a power source for electric ears? Write to general motors (ask about their sun racer) and to ford motor company and ask for information about their research on solar batteries and solar powered ears.

Solar energy is becoming increasingly important and common in our lives. Most children have seen solar cells used in calculators, cameras, and other devices that require small amounts of electricity.

The space program has rapidly expanded the development of this energy source. Satellite use electricity produced in this manner to recharge the batteries that provide electrical power.

A major obstacle to wide use of solar power is the limited amount of electric current each cell can produce. Huge areas of solar cells are required to produce significant amounts of electrical energy. The current produced flows in one direction just as in flashlight batteries... also, on the earth, solar cells as primary producers of electrcal energy are limited to day light hours and further inhibited by cloudy days.

Solar cells (often in clusters connected in series) can be obtained from many electronic supply stores.


Thursday, 2 May 2013


Where is your centre of gravity?

Materials needed

  • · Pencil or other small objects

Procedure

1. Put your pencil on the floor.
2. Standing near the pencil, pick it up without bending your legs or moving your feet.
3. Stand against the wall, with your heels touching the wall.
4. Drop your pencil on the floor near your feet.
5. Bend over and pick up your pencil without moving your feet or bending your legs. You must also not lean against anything or hold onto anything for support.
6. What happened? Why?
7. Repeat steps 1 and 2. Notice your movements as you pick up the pencil. Explain what happened in step 5 in terms of the effect of the centre of gravity.

For problem solvers: 

try this activity with family members and friends.try replacing the pencil with a coin or with a dollar bill. Can you find anyone who can pick up the object without breaking the rules?

Teacher information

Any time we are on our feet, whether we are walking, running, standing, or bending overawe are constantly adjusting to the centre of gravity in order to remain “balanced”. The body makes these adjustments so automatically that we don’t think about them.
The “for problem solvers” section invites students to try this activity with family members. Replacing the pencil with a dollar bill and offering it to the person who can pick it up without breaking the rules will increase interest and effort substantially. The money is as safe as if it were behind lock and key.


What is centre of gravity?


What is centre of gravity?

Materials needed

  • Meter stick (or yardstick)
  • String
  • Chair
  • Various books

Procedure

1. Balance the meter stick on the back of the chair. It will balance at its "centre of gravity," which should e at or very near the 50-cm (18-in) mark. The part of the chair where the meter stick rests is the fulcrum.
2. Get two identical books and tie a string around each one.
3. Make a loop in the other end of each string and slide the loops over opposite ends of the meter stick. Leaving the books supported at the ends of the meter stick, where is the centre of gravity (where the fulcrum has to be to balance the books)?
4. Replace one of the books with a smaller book. With the books still suspended at the ends of the meter stick, where is the centre of gravity?
5. Replace the other book with a larger one. Where is the centre of gravity now?
6. What can you say about the centre of gravity when a large object is balanced with a small object? Consider the teeter-totter as you explain your answer.

For problem solvers: 

do you know what a mobile is? Build one? then explain why it is important to know about centre of gravity when constructing mobiles? If you do not know what a mobile is, ask your teacher, a parent, or a friend to help you get started.

Wednesday, 1 May 2013

What other type of energy accompanies light from the sun?

What other type of energy accompanies light from the sun?

 Materials needed

  • Two magnifying glasses 
  •  One sheet of paper 
  • Glass bowl

Procedure

1. Ask your teacher where you should do this experiment. You will need to be in bright sunlight with no wind.
2. Put the paper in the bowl.
3. Hold the magnifying glass between the paper and the sun so a beam of light focuses on the paper.
4. Notice that as you move the magnifying glass closer to and farther from the paper, the point of light changes in size. Notice also that it gets brighter as it gets smaller.
5. Adjust the distance between the paper and the magnifying glass to make the point of light very small and bright. 
6. Pull the magnifying glass back about 1 cm (1/2 in). And watch the paper.
7. Do you see anything happening to the paper? If so what, and why do you think it is happening? What kind of energy is causing this to happen?
8. What do you might happen if you used two magnifying glasses focused on the same spot on the paper? Try it.

Tuesday, 30 April 2013

How can you get the most heat energy from the sun?


How can you get the most heat energy from the sun?

Materials needed


  • · Three identical jars
  • · Paper and pencil
  • · Black paper
  • · Aluminum foil
  • · Tape
  • · Three thermometers
  • · Sand

Procedure

1. Fill the three jars with sand.

2. Cover one jar with black paper, including the top,and tape the paper in place.

3. Cover the second jar with aluminium foil, including the top, and the tape the foil in place.

4. Leave the third jar uncovered.

5. Record the temperature shown on the thermometers. Be sure all three indicate the same temperature.

6. Insert one thermometer into the sand in each jar. With the two covered jars, puncture a hole in the top covering and insert the thermometer through the hole.

7. Place all three jars in sunlight. All should receive the same direct sunlight.

8. Check and record the temperature of the three thermometers every 15 minutes for about two hours.

9. How o the temperatures compare? What can you say about the effect of a black surface and a shiny surface on absorption of energy from the sun?

10. Remove the jars from the sunlight and continue to record the temperature of the three thermometers for two more hours.

Questions. How do the temperature changes compare? What can you say about the effect of a black surface and a shiny surface on heat loss?

For problems solvers

 here are more ways to compare the effect of color on heat absorption. Place a thermometer on a paper plate and lay a sheet of black paper over it.

Prepare a second plate using a thermometer and white paper, then a third using aluminum foil. On a warm, sunny day day, place all three plates in direct sunlight. Check and record the temperatures on the thermometers on the thermometers after one-half hour, then again after one hour.

If you live in a cold climate, place papers of various color on snow bank, in the sunlight.use a black paper, a white paper and a piece of aluminum foil of the same size. Use other colors also if you’d like to. Line them up, so the all have direct sunlight. After an hour, check the snow under the papers to find out how much has melted. Check them again after two hours.

Saturday, 22 September 2012

Make Your Own Water Rocket

 Part 2 Making Your Own Water Rocket 

Part 2 Making Your Own Water Rocket

The water rocket body to be introduced in this chapter will be a basic type that can be made using readily available materials; this type achieves a balance between safety and functionality. We suggest that you begin by building a water rocket following the process suggested here so that your students can learn the basics of rocket making. After they have mastered the basic design, you can encourage your students to exert their ingenuity in the pursuit of new designs.

What you will need 

Assemble the necessary materials and tools and run through the checklist before starting your class/workshop.

2 PET bottles PVC sheet ,File holder (Clear file), Vinyl bag (trash bag) , Modeling clay , Nozzle , Permanent magic marker (oil base)   , Cutter , Scissors , Cutting mat , Vinyl tape, Scale

Water rocket building process 

Making fins
Cutting out fin patterns Various shapes of fins can be made in height and width. Let’s make 4 fins of the pattern at left.


Using a permanent magic marker, draw fin pattern guidelines on a plastic sheet as shown in the illus-tration at left, then carefully cut out the patterns fol-lowing the guidelines.


Preparing the fin base


Bend the anchors to the left and right by aligning the ruler.
Divide the base of each fin into four equal parts by drawing and then cutting three guidelines. Alternately bend the anchors to the left and right. You can ensure a straight bend by aligning the ruler along the baseline. Repeat this process for each one of the four fins.
Make 4 fins in the same manner

 Making the skirt and attaching it to the rocket body
Cutting out the skirt section from a file holder (clear file)

Cut the clear file into a rectangular shape :The width : Wrap the clear file around the pet bottle and add a few centimeters to overlap at the leading  edge.The length : Wrap the sheet around the pet bottle and adjust its length so that the cylinder is slightly longer than the bottle’s mouth.

Wrapping the skirt material around the rocket body

 Having cut out the skirt, wrap it around the rocket body and use a magic marker to mark the position
where the two edges overlap. 


Dividing it into four equal parts and making creases 

Spread the rectangle flat again and divide it into four equal parts, using the previously marked line as a reference point. First fold the sheet into halves, then fold each half into quarters. Mark each  quarter and make creases.
Dividing it into four equal parts and making creases

 Making cuts along the creases and marked line

Make cuts along the creases and the marked line to divide the rectangle into four equal parts.
Making cuts along the creases and marked line

  Attaching the fins
 Insert the fins one by one into the skirt, then tape the slots securely from the reverse side of the skirt.
  Attaching the fins
Attach the fines to the skirt

Affixing the skirt to the rocket body
Wrap the skirt around the rocket body and fasten its starting edge with vinyl tape, then use more tape to firmly fix the skirt at its leading edge Check to see the skirt is fixed in the right position Check the skirt position to ensure that it extends beyond the end of the PET bottle’s mouth. 
 Affixing the skirt to the rocket body

 Making the nose cone

Marking the other bottle with cut guides 

The second bottle is used to make the nose cone. Use the permanent magic marker to mark cut guide-lines for the part that will become the nose cone.
Marking the other bottle with cut guides

Making partial cuts with a cutter

As shown in the photo, use the cutter to make partial cuts into each guideline. This is a safe way to open gaps for the use of scissors.  
Making partial cuts with a cutter
 Cutting along the guidelines
Use the scissors to cut off the nose cone. We have found that it is easier to remove the part near the bottle cap first. 
Cutting along the guidelines
Attaching the nose cone
Weigh out about 50 grams of modeling clay and apply it to the bottom of the rocket’s body

Attaching the nose cone


 Determine the center of gravity

Place the rocket on your forefinger to determine the center of  gravity. The center of gravity should be closer to the nose cone and not the actual physical center of the PET bottle.

 Determine the center of gravity
 Attaching the nose cone
 Attaching the nose cone
Push the nose cone over the rocket body and tape it securely into place. 

Putting the vinyl bag into the nose cone 

The vinyl bag acts as a cushion inside the nose cone. Unfold the vinyl bag and stuff it loosely into the nose cone.
Putting the vinyl bag into the nose cone

Sealing the nose cone
Prepare 10 to 15 strips of vinyl tape of a uniform length and use them to seal the nose cone opening. 

Final check 

The final step is to check the rocket thoroughly to ensure that it is not warped or otherwise damaged, and that all parts are firmly fixed. Attach the nozzle and check the length of the skirt if the top of the nozzle protrudes slightly from the skirt.
 Final check


Friday, 11 May 2012

Will seeds grow faster with more water or sunlight?

Will seeds grow faster with more water or sunlight?

Will seeds grow faster with more water or sunlight?
Science fair Project grade level 4 to 6 topic Seeds and Needs
Grade Levels:4-6
Questions:
Will seeds grow faster with more water?
Will seeds grow faster with more sunlight?
Possible Hypotheses:
Seeds will/will not grow faster with more water.
Seeds will/will not grow faster with more sunlight.
Materials:
Packet of bean seeds, Water, Tablespoon, Twenty snack-size zip-lock bags
Procedure:
1. Label ten bags from 1 to 10. Label the other ten bags 1-L to 10-L.
2. Place two seeds in each bag.
3. Add one tablespoon of water to bags 1 and 1-L, two tablespoons of water in bags 2 and 2-L, and so on until all the bags have water.
4. Place the bags in a sunny place. Leave the bags marked with an L in the sun all the time. Leave the other bags in the sun for two hours a day.
5. Compare the beans in the bags after one week. Record your observations.
Analysis and Conclusion:
What effect did the amount of water have on seed growth?  What effect did the amount of sunlight have on seed growth? Do you think the seeds would grow better if they were in sunlight 24 hours a day?

Source: Science Fair Projects

Tuesday, 17 April 2012

how to build a contact mic and geoboard instrument

how to build a contact mic and geoboard instrument

Play around with sound building a contact microphone and a musical instrument out of a piece of wood and rubber bands that produces different vibration and sounds. Make your own song and share with us here!


collect
PIEZOELECTRIC MICROPHONE
HEADPHONE CHECK
ELECTRICAL TAPE
A PIECE OF WOOD
RUBBER BANDS

Bobby and the students from Bonx, NY studio, play around with sound building a contact microphone and a musical instrument out of a piece of wood and rubber bands that produces different vibration and sounds. Make your own song and share with us in curiosity machine.org to get feedback from our engineers and badges!

Please visit and comment :http://curiositymachine.org/node/150

Science Fair research project for grade 4 to 6 Question is Which materials make good insulators?

Science Fair research project for grade 4 to 6 Question is Which materials make good insulators?


Grade Levels: 4-6
Question:
Which materials make good insulators?
Possible Hypotheses:
Foam is a good/poor insulator. Cloth is a good/poor insulator. Paper is a good/poor insulator.
Materials:
Two shoeboxes Scissors Two thermometers Piece of Styrofoam about one inch thick Newspaper Towel Black construction paper Tape
Procedure:
1. Tape black construction paper to the outside bottoms of the shoeboxes.
2. Place the box tops in a sunny place with the thermometers inside facing up. Record the temperatures.
3. Invert one box onto a top so the black bottom is toward the sun. This is your control.
4. Tape a piece of Styrofoam to the inside of the bottom of the second box, and then place it upside down over the second top.
5. Record the temperatures of both boxes after 15 minutes.
6. Remove the Styrofoam and tape thick pieces of newspaper in the bottom of the box. Repeat the procedure and record the temperatures.
7. Remove the newspaper and tape a towel into the bottom of the box. Repeat the procedure and record the temperatures.
Analysis and Conclusion:
Which material was the best insulator? What other substances might make good insulators?


Note: Do Experiment and share your results on Pakistan Science Club Forum

Science fair research project Can you produce a gas from decaying garbage?

Science fair research project Can you produce a gas from decaying garbage? grade for 4 to 6

Grade Levels:
4-6
Questions:
Can you produce a gas from decaying garbage?
Can you control the amount of gas produced from decaying garbage?
Possible Hypotheses:
A gas is/is not produced when garbage decays.The amount of gas from decaying garbage can/can not be controlled.
Materials:
Packet of dried peas or beans Six airtight clear plastic bags Water
Procedure:
1. Soak the beans or peas in water overnight.
2. Place 10 beans or peas into each bag and squeeze out all the air before you seal them.
3. Put two bags in a warm sunny place, two bags in a warm shady place, and two bags in a totally dark place for a week and observe what happens. Record your observations.
Analysis and Conclusion:
Did the decaying beans produce a gas? Which environment was best for producing gas? Do you think the gas could be used as a source of energy? Why and how?

source:Can you produce a gas from decaying garbage?


Note: Do Experiment and share your results on Pakistan Science Club Forum

Tuesday, 10 April 2012

Science fair research project Grade Levels 7-9 Does the acidity of the precipitation change during the year?

Does the acidity of the precipitation change during the year?
Science fair research project Grade Levels 7-9 Does the acidity of the precipitation change during the year?
Acid Rain
Grade Levels:7-9
Questions:
Does precipitation in your area contain acidic emissions from power plants, indus- tries or vehicle emissions?
Does the acidity of the precipitation change during the year?
Possible Hypotheses:
The precipitation does/does not contain acids? The acidity levels change/do not change during the year.
Materials: Litmus paper Plastic container Meter stick
Procedure:
1. Place a plastic container outside every day to catch any precipitation that falls.
2. Measure the amount and acidity of the precipitation every day at the same time and record on a calendar.
3. Analyze your data after several months.
Analysis and Conclusion:
Is the precipitation in your area acidic? Does the acidity level change and if so, why? What do you think causes any acidity in the precipitation? Research the power plants, industries and vehicle emissions in your area.

Source: Science fair projects

Science Fair Research Project Grade Levels: 7-9 Does adding salt to water lower its freezing point?

Does adding salt to water lower its freezing point?
 Does adding salt to water lower its freezing point
Science Fair Research Project Grade Levels: 7-9 Does adding salt to water lower its freezing point?

Frozen Salt

Question:
Does adding salt to water lower its freezing point?
Possible Hypothesis:
Adding salt does/does not lower the freezing point of water.
Materials:
Four 8-ounce plastic cups Measuring cup Box of table salt (sodium chloride) Freezer Thermometer Teaspoon
Procedure:
1. Fill four cups with six ounces each of tap water. Add a teaspoon of salt to one cup, two teaspoons to another, and three teaspoons to a third. Leave the fourth as your control.
2. Place the cups in the freezer. Observe the cups periodically until a thin layer of ice forms on the top of the water, and then record the temperature of each cup.
3. Record your observations.
Analysis and Conclusion:
Did adding salt lower the freezing temperature of the water? What was the effect of adding more salt to the water? Can you think of ways that this knowledge can be put to work for you?
source: Science fair Projects

Friday, 6 April 2012

Cooling Fan Science Fair Research Project Grade Levels 4-6

Cooling Fan Science Fair Research Project Grade Levels 4-6
Grade Levels: 4-6
Question:
Does a fan really cool the air?
Possible Hypotheses:
A fan does/does not cool the air.
Materials:
Portable Fan, Thermometer
Procedure:
1. On a hot day, place a portable fan on a table. Use a thermometer to record the temperature in the room.
2. Turn the fan on and hold the thermometer three feet from it so that the air blows on the thermometer. After one minute, record the temperature.
3. Hold the thermometer two feet from the fan, then one foot. Record the temperature. Analysis and Conclusion: Does a fan actually cool the air? Why does the air feel cooler?

Cooling Fan Science Fair Research Project Grade Levels 4-6

Wednesday, 4 April 2012

Clean Air Science Fair Research Project Grade Levels: 7-9

Clean Air Science Fair Research Project Grade Levels:  7-9

Grade Levels:
7-9
Question:

Does indoor or outdoor air have more particulate pollution?

Possible Hypotheses:
Inside air has more particulate pollution.Outside air has more particulate pollution.

Materials:
14 white index cards Petroleum jelly Cotton swabs Magnifying glass
Procedure:
1. Label the index cards 1-I to 7-I and 1-O to7-O.
2. Smear petroleum jelly on cards 1-I and 1-O using a cotton swab, and tape them to the same window, 1-I on the inside and 1-O on the outside. Avoid placing the cards near a door.
3. After 24 hours, take the cards down and repeat the procedure with the cards labeled 2-I and 2-O cards. Make a note of the weather each day.
4. Do this for a week, replacing the cards each day. Examine the cards closely and compare them to each other and to previous sets.
5. Record your observations, noting any differences.
6. Repeat the experiment in a different location or at a different time of year.

Analysis and Conclusion:
How does the inside and outside air compare? How does it compare in different weather, different locations and in different seasons? What do you think is the main source of particulate pollution in your area? Research and find out. Inside Outside

Source: www.NEED.org

Monday, 2 April 2012

Slow Cooker Science Fair Project research project

Slow Cooker Science Fair Project research project
 
Slow Cooker Science Fair Project research project
Grade Levels: 7-9
Question:
Which natural material works best to insulate a homemade slow cooker: paper, cloth, or hay? Possible Hypothesis: The best insulator for a slow cooker is paper/cloth/hay.
Materials:
3 cardboard boxes of equal size (large enough to hold pan and insulating material)
3 potatoes of equal size
3 identical cooking pans with lids Newspaper, cloth, hay Thermometer Water
Procedure:
1. Place one potato in each pan and cover with the same amount of water. Boil them simultaneously for two minutes over the same amount of heat.
2. Place a layer of one insulating material in the bottom of each box, place the pans inside the boxes, surround the pans with insulating material, and close.
3. After one hour, record the temperature of the interior of the potatoes.
Analysis and Conclusion:
Which insulator worked best? Is this an energy efficient way to cook food?

Thursday, 15 March 2012

Magnets and Heat Science Fair Project

Magnets and Heat Science Fair Project

Magnets and Heat
Grade Levels: K-3
Question:
Does temperature affect the force of a magnet?
Hypotheses:
Temperature does/does not affect the force of a magnet.
Materials:
Magnet Paper clips Hair drier
Procedure:
1. Record the number of paper clips the magnet can lift at room temperature.
2. Place the magnet in a freezer for 15 minutes. Record the number of paper clips the magnet can lift.
3. Use a hair drier to warm the magnet. Record the number of paper clips the magnet can lift.
Analysis and Conclusion:
Does changing the temperature of a magnet affect its force?
http://paksc.org/pk/science-fair-projects/item/802-magnets-and-heat-science-fair-project.html


kitchen waste biogas
Contact for Homemade kitchen waste biogas plant Projects

science fair projects
Free Winning Science Fair Projects Step-by-Step How-To-Do Resources Ideas, Urdu

Biogas Plant Blog
Biogas is alternative source of green energy our world future

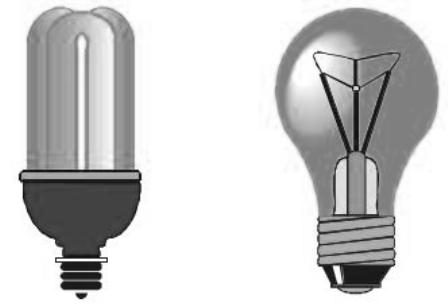
Comparing Light Bulbs Science Fair Project

Comparing Light Bulbs Science Fair Project

Comparing Light Bulbs
Grade Levels:
K-3
Questions:
Do incandescent and fluorescent bulbs produce the same kind of light? Do incandescent and fluorescent bulbs produce the same amount of heat?
Hypotheses:
Incandescent and fluorescent bulbs do/do not produce the same kind of light. Incandescent and fluorescent bulbs do/do not produce the same amount of heat.
Materials:
One incandescent and one fluorescent bulb that produce equivalent lumens Thermometer Lamp
Procedure:
1. Have an adult place the fluorescent bulb in the lamp and turn it on. Observe the light that is produced.
2. Hold a thermometer six inches above the bulb for one minute and record the temperature. Turn off the lamp and let the bulb cool.
3. Have an adult remove the fluorescent bulb, place the incandescent bulb in the lamp and turn it on. Observe the light that is produced.
4. Hold a thermometer six inches above the bulb for one minute and record the temperature.
Analysis and Conclusion:
Could you tell any difference in the kind of light the two bulbs produced? Did one bulb produce more heat than the other? Which bulb is more energy efficient?
http://paksc.org/pk/science-fair-projects/item/801-comparing-light-bulbs-science-fair-project.html

kitchen waste biogas
Contact for Homemade kitchen waste biogas plant Projects
science fair projects
Free Winning Science Fair Projects Step-by-Step How-To-Do Resources Ideas, Urdu
Biogas Plant Blog
Biogas is alternative source of green energy our world future
Science Fair Projects Blog

Sun or Shade Science Fair Project

Sun or Shade Science Fair Project
Sun or Shade
Grade Levels: K-3
Question:
Is the air the same temperature in the sun and in the shade?
Hypotheses:
The air is/is not the same temperature in the sun and in the shade.
Materials:
Thermometer
Procedure:
1. Hang a thermometer in the shade for five minutes. Record the temperature of the air.
2. Hang the thermometer in the sun for five minutes. Record the temperature of the air.
Analysis and Conclusion:
Is the air really warmer in the sun or does it feel like it is warmer because the sun’s energy is hitting your skin?
Sun or Shade Science Fair Project

kitchen waste biogas
Contact for Homemade kitchen waste biogas plant Projects
science fair projects
Free Winning Science Fair Projects Step-by-Step How-To-Do Resources Ideas, Urdu
Biogas Plant Blog
Biogas is alternative source of green energy our world future

Sunday, 11 March 2012

Thermal Energy Put to Work


Thermal Energy Put to Work
Grade Levels:
7-9
Question:
Can thermal energy be made to do useful work?
Possible Hypotheses:
Thermal energy is/not useful energy that can be used for work.
Materials:
Plastic 1-liter bottle Large balloon Bowl of hot (not boiling) water Bowl of ice water Small rock
Procedure:
1. Cool the balloon and the bottle in the freezer for 5 minutes.
2. Fill the bowl with hot, not boiling, water.
3. Put the balloon over the mouth of the bottle making sure that the air has been squeezed from the balloon. Place the bottle into the hot water.
4. The air inside the bottle should expand and inflate the balloon. After it is inflated, put the bottle in the bowl of ice water and observe it deflate.
5. Design a device to convert this expansion and contraction into usable work, such as lifting a rock. Design a device that circulates hot, then cold, water so that the balloon deflates and inflates without moving the bottle.
Analysis and Conclusion:
Were you able to make a device that per-formed useful work? Can you think of de-vices that convert thermal energy into mo-tion? Can you think of a way to convert thermal energy into electrical energy? Re-search internal combustion engines and turbine generators.


science fair projects
Free Winning Science Fair Projects Step-by-Step How-To-Do Resources Ideas, Urdu


Science Fair Projects PDF Download
 

science fair project Hot Ice

Hot Ice

science fair project Hot Ice

Hot Ice
Grade Levels:
K-3
Question:
Which will become ice faster, hot or cold water?
Possible Hypotheses:
Cold water will freeze faster/slower than hot water.
Materials:
Two Styrofoam cups Hot tap water Cold tap water Procedure:
1. Fill one cup with very cold water. Fill the other with the same amount of very hot water. Label one cup hot and the other cup cold.
2. Put both cups in the freezer and check every 10-15 minutes. Record which one begins to freeze first.
3. Leave them in the freezer until the following day. Take them out and see if there is any difference in the ice cubes.
Analysis and Conclusion:
Which one froze first? Did both cubes end up being the same size?


kitchen waste biogas
Contact for Homemade kitchen waste biogas plant Projects
science fair projects
Free Winning Science Fair Projects Step-by-Step How-To-Do Resources Ideas, Urdu
Biogas Plant Blog
Biogas is alternative source of green energy our world future

Hot Ice
Related Posts Plugin for WordPress, Blogger...