Share

Friday, 30 March 2012

How to make power Inverter in Urdu

 How to make power Inverter in Urdu

Read More 500 Watt 12DC to 220 VAC Power Inverter (UPS)Construction in Urdu

500 Watt 12DC to 220 VAC Power Inverter
500 Watt 12DC to 220 VAC Power Inverter (UPS)Construction in Urdu
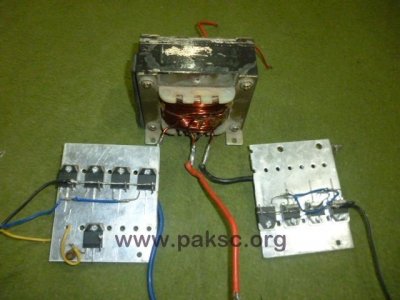
500 Watt 12DC to 220 VAC Power Inverter (UPS)Construction in Urdu Power Inverter (UPS)Construction in Urdu this is a simple inverter you can make your own if you have Little Bit of Knowledge about electronics this inverter can run 1 watt to 500 watt appliances
Discussions about Pakistan Science Club's Power Inverters 12 VDC to 220 VAC UPS, you can find problems, troubleshooting and construction help Please visit Power Inverters (UPS)12 VDC to 220" http://paksc.org/pk/forum.html See also Easy Homemade 50 watt Power Inverters (12 VDC to 220 VAC) UPS Power Inverter (UPS) Circuit inverter diagram Schematic of an Inverter…

See also

Power Inverter (UPS) Circuit inverter diagram

Thursday, 29 March 2012

Solar water Distiller Science Fair Project

Science Experiment

Solar Distiller Science Fair Project


Solar Distiller Science Fair Project
 Solar Distiller Science Fair Project
Solar Distiller
Grade Levels: 7-9
Questions:
Can you distill clean water from muddy water?
Can you distill clean water from salty water?
Possible Hypotheses:
You can/cannot make clean water from muddy water. You can/cannot make clean water from salty water.
Materials:
Two large plastic containers Clear plastic wrap Masking tape Two small rocks Two small glasses Two tablespoons of dirt Two tablespoons of salt Water
Procedure:
1. Fill both plastic containers with one inch of water. Mix the dirt into the water in one and the salt into the other.
2. Place one empty glass upright into the middle of each plastic container. Make sure it remains empty.
3. Cover both plastic containers tightly with plastic wrap and seal them with tape. Place a small rock in the middle of the plastic wrap directly over the glass but not touching it.
4. Place the stills in a sunny place for two hours. Examine any water that forms in the glass. Record your observations.
Analysis and Conclusion:
Did the stills make clean water? Can you explain how they worked? Can you imagine a situation in which this knowledge could save your life?

Saturday, 24 March 2012

Science Fair Project Ideas

Science Fair Project Ideas

Thick Liquids

Design an experiment to find out how the thickness (viscosity) of a liquid
affects how objects sink into it. You can drop fishing weights into equal
amounts of liquids. Use a stopwatch to measure the time for the fishing
weights to reach the bottom of each container.

Conducting Heat

Design an experiment to find out how long it takes heat to travel through a
solid. You can use a metal skewer and attach small blobs of wax to it. With
an adult’s help and using a pot holder, you can hold the tip end near a heat
source. Then, use a stopwatch to measure the time it takes for each piece of
wax to melt and fall off.

Megaphone Ears?“

After you have studied sound, measure how much further you are able to
hear when your “ears” are enlarged. Using paper cup ears, you can measure
the distance at which you can hear a ticking clock. Then design and test the
best “ear” to capture sound.
Plan and conduct an experiment to find out how well people can predict
colors. You can use food coloring to tint water in clear bottles or glasses.
Several objects can be selected, each a different color. Find out what color
the object appears when seen through the tinted water, when lighted with a
beam shone through the Water, and when seen in white light. Ask others to
look at the object through the tinted water and predict what color it will be
in white light.

Design an experiment to find the best treatment to reduce the cling caused
by static electricity. You can begin by rubbing air-filled balloons with wool
to generate static electricity. The amount of static electricity can be inferred
by observing how much confetti a balloon will pick up. Rub or coat the
balloon with various liquids to see how the liquids affect static cling.
Design an experiment to measure the speed of an animal such as an insect,
a bird, or a family pet. For example, you might measure the time it takes for
a beetle to crawl through a plastic tube. Be sure that you treat all animals
humanely.

Read a book such as How D0 You Lift a Lz'011?by Robert E. Wells. You can
design an experiment to find the most efficient Way to pull a heavy object,
such as a panda, on a pallet. A spring scale can be used to measure force.
Provide graphs that illustrate your findings. If you used a book, remember
to credit that book

How to build a hot air balloon

How to build a hot air balloon

HOT AIR! Design + build + fly a hot-air balloon to lift a weight.

COLLECT

  • poster board (1 sheet)
  • tissue paper (10-12 sheets)
  • glue stick
  • scissors
  • ruler
  • piece of wire to shape into a ring
  • string
  • hair dryer
The better designed the balloon is, the more weight it will be able to lift.
Why do hot air balloons rise up? Hot air balloons rise because they are filled with air hotter than the air around them, and hot air is lighter than cold air. Why is hot air lighter than cold air? When a material is heated, its molecules absorb the heat or energy and with this extra energy are able to move around at greater speeds.
In objects that can stretch and expand, molecules with extra energy can move farther apart. When the molecules move, the object grows in size or volume. It doesn't change in weight, though, because the number of molecules doesn't change. It is made of the same number of molecules, just located farther apart. This makes the object less dense, but maintains its weight.

When we start heating the air of a hot air balloon, the air molecules start moving around with more energy. As the hotter air expands, the balloon expands, but its weight does not change right away.
Once the balloon has expanded as far as it can, then the energetic molecules start escaping out of the hole at the bottom. This leaves less molecules inside, making the balloon lighter than the cooler air around it. The balloon rises.

Experiment

1. Draw and cut a template for the hot air balloon side panels out of the poster board. You will use this to make tissue paper cutouts of the same size. Draw the typical shape you see in modern balloons or try creating new shapes you would like to test.
2. Using your template, cut 8 tissue paper side panels.
3. Glue the panels together into a balloon shape.
4. Cut out a circular piece of tissue paper to cover the top of the hot air balloon and glue it on.
5. Cut some wire coil and shape into a circle.
6. Place the coil at the bottom of the balloon, fold over the tissue paper over it, covering it, and glue it in place.
7. Make a basket out of the poster board and attach it with string or tape to this coil ring, and place a weight in the basket.
8. Heat up the balloon with the hair dryer, let it go and watch it rise!

Source: http://curiositymachine.org/node/68

Monday, 19 March 2012

how to build a s skycraper earth-quake resistent


Swinging and swaying! Use inertia to stabilize a skyscraper you build.

skycraper earth-quake resistent 

collect
POPSICLE STICKS
TAPE
PAPER CLIPS
PLAY DOUGH
RUBBER BAND
STRING
HOT GLUE GUN
Two of nature’s strongest natural forces – wind and earthquakes – can have a great effect on our tallest man made structures, skyscrapers.
At high altitudes (at the tops of our high skyscrapers), wind can reach very high speeds. Wind speed increases with altitude. The wind moves slower closer to the ground because of friction. On the ground, air molecules bump into things like trees, rough terrain, buildings, etc which partially block the flow of the wind. The higher you rise in Earth’s atmosphere the less obstacles in the way of the wind causing wind speed to increase. High speed winds can push on a building and cause it to sway back and forth.
Have you ever felt the ground shake when a large trucks drives by on a bumpy road? When the truck passes by, it is sending vibrations out into street and down into the dirt and after a chain reaction of vibrations, the ground underneath your feet starts to vibrate. These are pretty small vibrations, so they are nothing to worry about, but there are times that the earth shakes more violently, during an earthquake!
The earth is very hot at its core, so hot in fact that deep in the Earth there are not solid rocks, but molten liquid rocks. On top of the liquid floats the crust of the Earth, the hard layers of rock where we live. This hard layer is broken up into a number of pieces called tectonic plates. The joints where these plates come together are called plate boundaries. The big tectonic plates grind and slide past one another sometimes, which causes huge vibrations, that we call earthquakes.
If you build a tower of blocks on the floor and then jump up and down really hard next to it, you know that vibrations can be trouble for tall buildings. If you blow hard enough you might even be able to blow the blocks over. Skyscrapers are in danger of falling over unless engineers design them correctly to withstand the vibrations from earthquakes and wind gusts.
One way that engineers try to offset the effects of the vibrating earth and blowing wind is to install mass dampers. In its simplest form a mass damper is a large heavy ball hanging by a string at the top of a large building. How does it work? When an earthquake shakes a building it tends to start the building swaying back and forth. The ball however does not want to start swaying, because it has inertia. Inertia is the property of matter that makes it hard to start or stop moving. Grab a hold of something heavy and try to shake it. When is it most difficult? When you try to change the weights direction! The bigger the object the harder it is to get moving. So how does this apply to the skyscraper?
Imagine the skyscraper is swaying to the right. As it starts to sway the ball is applying a force (a pull) to the left, but eventually, it will start to move to the right too, just like the weight responded when you changed its direction. When the building starts to sway back to the left, the ball is moving to the right still and again will apply a force in the opposite direction that the building is moving. This tends to keep the building more stable.

experiment
Build a sky scrapper at least 1.5 feet tall, using your supplies.

Use Popsicle sticks to build a frame that can attach to the top of your sky scraper. This frame will hold up your mass damper (ball of play dough), so it needs to be strong.

Clump your play dough into a ball around the paper clip so there is a hook sticking out of the top that you can attach a string or rubber band to.

Secure your frame and hanging ball on the top of your sky scraper.

Shake shake shake!

reflect
To see if the mass damper is working, try unhooking it and just setting the ball on the top of your sky scraper.
Is the building swaying more or less than when it was installed?
Does the speed at which you shake affect how well the mass damper works?
What happens when you make the string longer or shorter?
What about the weight of the ball, does that affect how well the mass damper works?

Original Post here http://curiositymachine.org/node/47


Thursday, 15 March 2012

BioGas Plant Digester Home Experiments for students

BioGas Digester Home Experiments For Kids
BioGas Plant Digester Home Experiments for students


This is a contribution of home experiments, that is sure to be very useful:

Procedure:

1) use a container in square or cylindrical concrete, iron or clay and place it outdoors in the sun.

2) The lid of the container (concrete, iron or plastic) must be crossed by a tube to the outlet of the bio-gas. A water seal as shown in the figure does not let the gas escape.

3) Fill the container of wet products (manure, organic wastes such as straw, dead leaves, etc)

4) You must leave an empty space between the waste and cover, plus or minus 1 / 4 of total volume.

5) Keep it uncovered for 10 days, you should remove it every day.

6) Now, you must set the cap, starting the process of fermentationwithout air (anaerobic)

7) After ten days the methane gas (biogas) invade the space above the waste and can be used for 50 days for heating elements in the kitchen.

8) After this period, empty the digester will be charged again for another cycle.

9) The waste make excellent fertilizer for crops


Biogas Experiments For Kids - How does a biogas plant?

In the agricultural biogas plants are used to generate energy from waste.What happens there?

A biogas system in agriculture – an image which we see future perhaps more frequently

Are organic compounds made of air, then they begin to decompose, then they say, they “rot”. That may be dead plants, but also dead animals.These bacteria are responsible for decomposition, which have specialized to live without oxygen. Therefore they are called in experts “anaerobic” bacteria.

As products of this decomposition, a mixture of methane and carbon dioxide and other gases in small amounts. It is also formed less than 1% hydrogen sulphide.

The described decomposition process takes place everywhere in nature where naturally adjusts itself to an air termination, including swamps, or dunghill. In addition to the gases formed as a reaction product also digested sludge.

How does a biogas plant?

The natural decomposition processes in nature are the inspiration for modern biogas plants. The starting materials are first into a vat, or “digester” called. Remain in that fermenting the raw materials for several days. The bacteria do their work and degrade these substances, it constantly creates biogas. To increase the effectiveness, the starting materials in the fermentation tank are stirred.

The resulting biogas is cleaned and dried. To use, it must be saved. The speed of decomposition and thus the biogas production also depends on the temperature inside the digester, so it is heated to temperatures around 40 ° C. After the decomposition of biomass residues are fermented into a sludge tank.

What raw materials are used in a biogas plant?

There are basically all types of waste biomass. These include liquid manure (“manure”), solid manure, agricultural waste, slaughterhouse waste, green waste, food waste from restaurants or the content of the widespread urban organic waste bins.

What to do with the resulting biogas?

The methane in biogas is one caused by burning fuels dar. its energy is converted into heat energy. This allows combustion engines converted to operate, which in turn use a generator to produce electricity. The resultant residual heat (“heat”) can be used as domestic heating, agriculture, or used to heat the digester.

What happens to the Bioren from the sludge tank?

This biomass can be used in agriculture as fertilizer. Because it forms when spread on fields no longer smells, the acceptance of such fertilizers is very high. During the decomposition of the starting materials and the seeds of weeds are killed, what is the fertilizer with the remaining mass is desired.

Biogas plants also have disadvantages?

Yes. Biogas is very toxic and explosive. Improper handling of the biogas and non-compliance with requirements for plant safety are risk factors in the operation of such facilities. It came in the past to serious accidents in biogas plants, some of fatalities. Even the technology used in some cases not mature, it was already too explosions with injuries of those involved.

Biogas (Methane) Making Experiment

Advanced Experiment: Making Methane


The natural gas we use in our homes is composed mostly of methane that took millions of years to form from decomposing organisms deep underground. You can mimic the natural gas formation process by using decomposing vegetable matter to create biogas.
Biogas is different from natural gas. It contains methane and carbon dioxide, but not the wide variety of hydrocarbons found in natural gas. However, the conditions that create biogas most rapidly in your experiment are the same conditions that were most favorable for the creation of natural gas millions of years ago.

Materials:
  • 6 identical small-necked bottles (plastic water or soda bottles work well)
  • 6 large party balloons, not inflated
  • 1½ cups of soil
  • 2 cups of a mixture of vegetable scraps and grass clippings
  • Duct tape
  • Funnel
  • Measuring cup
  • Permanent marker
Directions:
  1. Mix the soil and vegetable scraps well. Divide up the mixture into six equal portions of about ½ cup each. Put one portion into each bottle.
  2. Stretch an uninflated balloon over the opening of each bottle and secure it with duct tape.
  3. Use the marker to indicate on each bottle the level of the mixture. Put the date by your mark.
  4. Place the bottles upright in the following places. (Be sure to let the adults in your home know what they are for so they won’t be disturbed!)
    • In the fridge
    • In the freezer
    • In direct sunlight
    • In artificial light
    • Under the kitchen sink
    • Near a heat source
  5. Observe the bottles every other day for 10 days. When you observe them, use the marker to indicate on each bottle the level of the mixture (put the date by your mark). Also measure the circumference of each balloon daily and record this along with the date.
  6. Chart your results.
  7. Dispose of the mixtures outdoors, away from flames.
Analysis:
  • What was the relationship between the levels of the mixtures and what happened to the balloons?
  • In which locations did the balloons grow biggest, and why? In which locations did the balloons grow the least, and why?
  • Compare your experiment’s results and the conditions that allowed for the formation of natural gas deposits millions of years ago.
Further Research:
Do some library or Internet research to find out where and how biogas is made, and what it is used for.

Saving Hot Water Science Fair Project

Saving Hot Water  Science Fair Project

Saving Hot Water
Grade Levels: K-3
Question:
Does it save more water to take a shower or a bath?
Hypotheses:
It takes more/less water to take a shower than a bath.
Materials: A bathtub with a shower Bath crayons - 2 colors (If a bath crayon is not available, tape may be used.)
Procedure:
1. Have each member of your family plug the drain when taking a shower for one week.
2. Measure the amount of water used by marking the water level on the side of the tub with the crayon. Use one color for marking shower levels.
3. The next week, have each person take a bath instead of a shower. Make sure the amount of water used in the same way. This time use the other bath crayon.
Analysis and Conclusions:
Compare the amount of water used for baths and showers for each member of your family. Which saved water and energy in your house?

kitchen waste biogas
Contact for Homemade kitchen waste biogas plant Projects
science fair projects
Free Winning Science Fair Projects Step-by-Step How-To-Do Resources Ideas, Urdu
Biogas Plant Blog
Biogas is alternative source of green energy our world future
Science Fair Projects Blog

Magnets and Heat Science Fair Project

Magnets and Heat Science Fair Project

Magnets and Heat
Grade Levels: K-3
Question:
Does temperature affect the force of a magnet?
Hypotheses:
Temperature does/does not affect the force of a magnet.
Materials:
Magnet Paper clips Hair drier
Procedure:
1. Record the number of paper clips the magnet can lift at room temperature.
2. Place the magnet in a freezer for 15 minutes. Record the number of paper clips the magnet can lift.
3. Use a hair drier to warm the magnet. Record the number of paper clips the magnet can lift.
Analysis and Conclusion:
Does changing the temperature of a magnet affect its force?
http://paksc.org/pk/science-fair-projects/item/802-magnets-and-heat-science-fair-project.html


kitchen waste biogas
Contact for Homemade kitchen waste biogas plant Projects

science fair projects
Free Winning Science Fair Projects Step-by-Step How-To-Do Resources Ideas, Urdu

Biogas Plant Blog
Biogas is alternative source of green energy our world future

Comparing Light Bulbs Science Fair Project

Comparing Light Bulbs Science Fair Project

Comparing Light Bulbs
Grade Levels:
K-3
Questions:
Do incandescent and fluorescent bulbs produce the same kind of light? Do incandescent and fluorescent bulbs produce the same amount of heat?
Hypotheses:
Incandescent and fluorescent bulbs do/do not produce the same kind of light. Incandescent and fluorescent bulbs do/do not produce the same amount of heat.
Materials:
One incandescent and one fluorescent bulb that produce equivalent lumens Thermometer Lamp
Procedure:
1. Have an adult place the fluorescent bulb in the lamp and turn it on. Observe the light that is produced.
2. Hold a thermometer six inches above the bulb for one minute and record the temperature. Turn off the lamp and let the bulb cool.
3. Have an adult remove the fluorescent bulb, place the incandescent bulb in the lamp and turn it on. Observe the light that is produced.
4. Hold a thermometer six inches above the bulb for one minute and record the temperature.
Analysis and Conclusion:
Could you tell any difference in the kind of light the two bulbs produced? Did one bulb produce more heat than the other? Which bulb is more energy efficient?
http://paksc.org/pk/science-fair-projects/item/801-comparing-light-bulbs-science-fair-project.html

kitchen waste biogas
Contact for Homemade kitchen waste biogas plant Projects
science fair projects
Free Winning Science Fair Projects Step-by-Step How-To-Do Resources Ideas, Urdu
Biogas Plant Blog
Biogas is alternative source of green energy our world future
Science Fair Projects Blog

Sun or Shade Science Fair Project

Sun or Shade Science Fair Project
Sun or Shade
Grade Levels: K-3
Question:
Is the air the same temperature in the sun and in the shade?
Hypotheses:
The air is/is not the same temperature in the sun and in the shade.
Materials:
Thermometer
Procedure:
1. Hang a thermometer in the shade for five minutes. Record the temperature of the air.
2. Hang the thermometer in the sun for five minutes. Record the temperature of the air.
Analysis and Conclusion:
Is the air really warmer in the sun or does it feel like it is warmer because the sun’s energy is hitting your skin?
Sun or Shade Science Fair Project

kitchen waste biogas
Contact for Homemade kitchen waste biogas plant Projects
science fair projects
Free Winning Science Fair Projects Step-by-Step How-To-Do Resources Ideas, Urdu
Biogas Plant Blog
Biogas is alternative source of green energy our world future

Sunday, 11 March 2012

Thermal Energy Put to Work


Thermal Energy Put to Work
Grade Levels:
7-9
Question:
Can thermal energy be made to do useful work?
Possible Hypotheses:
Thermal energy is/not useful energy that can be used for work.
Materials:
Plastic 1-liter bottle Large balloon Bowl of hot (not boiling) water Bowl of ice water Small rock
Procedure:
1. Cool the balloon and the bottle in the freezer for 5 minutes.
2. Fill the bowl with hot, not boiling, water.
3. Put the balloon over the mouth of the bottle making sure that the air has been squeezed from the balloon. Place the bottle into the hot water.
4. The air inside the bottle should expand and inflate the balloon. After it is inflated, put the bottle in the bowl of ice water and observe it deflate.
5. Design a device to convert this expansion and contraction into usable work, such as lifting a rock. Design a device that circulates hot, then cold, water so that the balloon deflates and inflates without moving the bottle.
Analysis and Conclusion:
Were you able to make a device that per-formed useful work? Can you think of de-vices that convert thermal energy into mo-tion? Can you think of a way to convert thermal energy into electrical energy? Re-search internal combustion engines and turbine generators.


science fair projects
Free Winning Science Fair Projects Step-by-Step How-To-Do Resources Ideas, Urdu


Science Fair Projects PDF Download
 

science fair project Hot Ice

Hot Ice

science fair project Hot Ice

Hot Ice
Grade Levels:
K-3
Question:
Which will become ice faster, hot or cold water?
Possible Hypotheses:
Cold water will freeze faster/slower than hot water.
Materials:
Two Styrofoam cups Hot tap water Cold tap water Procedure:
1. Fill one cup with very cold water. Fill the other with the same amount of very hot water. Label one cup hot and the other cup cold.
2. Put both cups in the freezer and check every 10-15 minutes. Record which one begins to freeze first.
3. Leave them in the freezer until the following day. Take them out and see if there is any difference in the ice cubes.
Analysis and Conclusion:
Which one froze first? Did both cubes end up being the same size?


kitchen waste biogas
Contact for Homemade kitchen waste biogas plant Projects
science fair projects
Free Winning Science Fair Projects Step-by-Step How-To-Do Resources Ideas, Urdu
Biogas Plant Blog
Biogas is alternative source of green energy our world future

Hot Ice

Colors and Light


Grade Levels: K-3
Question: Do some colors absorb more sunlight than others?
Possible Hypotheses:
All colors absorb the same amount of sunlight. Some colors absorb more sunlight than others. Materials: Four tall clear glasses Water Food coloring Immersion thermometer
Procedure:
  1. Fill the glasses with the same amount of cold water. Record the tempera- ture of the water.
  2. Add 20 drops of red food coloring to one glass, 20 drops of yellow to one glass, and 20 drops of blue to one glass.
  3. Place all four glasses in a sunny place for 15 minutes.
  4. Record the temperature of the water in all four glasses.
Analysis and Conclusion:
Did the temperature of the water change? Which water got warmest? What did you learn about colors and light?

 Colors and Light Colors and Light Colors and Light Grade Levels: K-3 Question: Do some colors absorb more sunlight than others?

Saturday, 10 March 2012

Static Power

Static Power

Grade Levels:
K-3
 
Background:
When coal is burned in a power plant, small particles of pollution called soot are produced. Static electricity can be used to capture soot before it leaves the power plant.

Question:
Can a mixture of salt, sugar and pepper be separated using static electricity?

Possible Hypotheses:
A mixture of salt, sugar and pepper can/cannot be separated.

Materials:
Sugar, salt, and pepper Small plate Plastic comb Piece of wool

Procedure:
1. Stroke the comb with wool to give it an electric charge.
2. Put small amounts of sugar, salt, and pepper on a plate.  Do not mix them
together.  Beginning a few inches above the plate, move the comb closer to the particles.  Observe to see if one type of particle reacts before the others.
3. Record your observations.
4. Repeat the experiment with the salt, sugar, and pepper mixed together.

Analysis and Conclusion:
Are the particles attracted to the comb at different heights above the plate?
Can you separate a mixture of salt, sugar, and pepper using static electricity?
Could static electricity be used to clean the air at a coal-burning power plant?


Useful links
kitchen waste biogas
Contact for Homemade kitchen waste biogas plant Projects
science fair projects
Free Winning Science Fair Projects Step-by-Step How-To-Do Resources Ideas, Urdu
Biogas Plant Blog
Biogas is alternative source of green energy our world future

Science Fair Projects PDF Download

Source:http://need.org/Science-Fair-Projects

Ads
kitchen waste biogas
Contact for Homemade kitchen waste biogas plant Projects
science fair projects
Free Winning Science Fair Projects Step-by-Step How-To-Do Resources Ideas, Urdu
Biogas Plant Blog
Biogas is alternative source of green energy our world future

test various types of batteries

Battery Testing

Objective

To test various types of batteries to determine which last the longest.

Difficulty

Procedure: Easy
Concept: Easy

Concept

Have you ever noticed how the price of Duracell or Energizer batteries is significantly more than generic brands? Does this price difference actually make a difference? Obviously, the goal here is to save money. If all batteries are the same and will last the same length of time then there is no reason to spend extra on name brands.

Hypothesis

What do you think? Is Energizer the best? Or maybe Duracell?

Materials

  • Various brands of AA batteries
  • Multimeter (optional)
  • Resistors (optional)
  • LEDs (optimal)
  • Wire (optional)
  • Breadboard (optional)
  • Tape
  • Timer
  • CD Player
  • Flashlight

Procedure

  1. The first step will be constructing an apparatus that can test the batteries. Depending on how involved you would like to make the project, you can either use the CD player or create a small resistive load to drain the batteries.
  2. If you choose to use the CD player, find a CD, set it to repeat and run the player until the batteries die. Similarly, you can use a flashlight to run the batteries down. Record the time it takes and repeat with each brand of battery. Make sure to run multiple trials with each brand.
  3. If you are more familiar with electronics, you may want to try creating your own circuit to test the batteries. By simply wiring an LED in series with a resistive load, you will be able to see the light grow dimmer as the battery runs down. Record the time it takes for the light to go out.
  4. Light goes dimmer as the battery runs down
  5. After all the data has been recorded, average the times over each brand of battery. Graph the results and compare.

Review of Literature

Different batteries perform better under different conditions. Many companies create datasheets of their products. By looking at these datasheets and combining them with Ohm's law, it is possible to calculate what the expected battery life should be depending on the resistive load.

Results

You can plot the results of your findings in a graph or chart, using the variables battery name and time (that the battery lasts). If you want to make a graph in Excel, look at our Graphing in Excel page.

Conclusions

This section is for you to fill in. Your discussion should focus on explaining any trends you found in your data. Remember, even if you cannot find any trends, that result is still significant. Also, try to think of a way to compare the price/value of each brand of battery to determine which gives the best deal. There are many extensions to this project. For example, what are the differences in performance between the various types of batteries (i.e. AA, AAA, C, D, etc.)? Do lithium batteries last longer than alkalines? Do not limit yourself to just this guide. Try to come up with your own additions.
 Source:http://sciencefair.math.iit.edu

kitchen waste biogas
Contact for Homemade kitchen waste biogas plant Projects
science fair projects
Free Winning Science Fair Projects Step-by-Step How-To-Do Resources Ideas, Urdu
Biogas Plant Blog
Biogas is alternative source of green energy our world future

determine the strength of Bag Strength

science fair projects

 Bag Strength

Objective

To determine the strength of a particular type of bag (for example, plastic bags) and exactly how much the strength increases when multiple bags are used.

Difficulty

Procedure: Easy
Concept: Easy

Concept

Take a plastic bag and fill it with stuff until it breaks. Now take two more plastic bags, just like the first one, insert one inside the other and fill that inner bag up with the same amount of stuff that broke the first bag. Will that bag break? Will both break? What do you think will happen?
The idea to test here is whether there is some sort of linear relationship between the amount of weight that bags can hold and the number of bags used. Another way to put it is this: do two bags, one inside the other, hold twice as much as one bag? The other possibility is that there is some sort of exponential growth in the amount of weight that the bags can hold. An example of this would be if two bags could hold three times as much as one bag, and three bags could hold nine times as much as one bag. The final possibility is that there is no change whatsoever. These are the things you need to think about, formulate a hypothesis, and test.

Hypothesis

Which pattern of growth of strength do you think you will see as more bags are added? Think carefully about the concept questions and then formulate your hypothesis.

Materials

  • Lots of bags
  • Uniform Weights
  • Scale
Plastic bags are recommended because they are easy to come by in large numbers, but you could try this with paper bags, too, or even garbage bags, as long as you have sufficient weight to test them with.
You will definitely need a lot of weight to test your bags with, preferably many items of the same weight. You can create this simply by filling some Ziploc bags with the same amount of sand. Feel free to use other items or methods as well.
Finally, you will need something to suspend the bag from. An existing nail in the wall (DON'T RUIN YOUR HOUSE) would be a good example of this. You might even be able to hang this from a sturdy coat hanger.

Procedure

  1. The first step is to find the breaking point of one solitary bag. Hang it on your coat hanger or whatever you found and begin filling it. Make sure the scale is underneath, as it will save you a little work later. At some point your bag will give in and break. Note where the bag fails. Was it the handles, or did the bottom fail first? While this is not what you are testing at the moment, it may help with future analysis of your data.
  2. With any luck, when your bag failed the weights inside should have fallen to the scale. If not, just pick them up and put them on the scale (this is why sandbags or Ziploc bags with sand in them are recommended, as they're easily movable and shouldn't make a mess). Record the weight it took to break the bag, then do this same test with at least three more bags. This is to make sure that the bags break at some consistent weight range.
  3. Once you've taken down the breaking weights of at least four single bags (and made sure that they're fairly consistent with each other!) you are ready to try double bags. Insert one bag into another so that the one is basically acting as a liner for the other, then hang both from your hanger over the scale. Again, fill it up until the bag breaks, record the weight, and repeat this trial for double bags at least three times.
  4. After the double bags, try the same procedure at least four times for triple bags and quadruple bags. We encourage you to do as many extra trials as you need to feel completely satisfied with your data. You can even add more bags into the equation. Remember, the more data you take, the easier it will be to draw meaningful conclusions from the data.

Analysis

Take your table of data and plot all the data onto a graph, using the variables number of bags and weight held. Could you possibly draw a straight line through the points? If so, we recommend you check out our Line Fitting Guide for a detailed tutorial.

Conclusions

What does the data tell you about the behavior of bag strength as more bags are used? Was your hypothesis right or wrong?

Extensions

Like we said before, you can keep adding bags and seeing how much more they can hold. You can also try different types of bags and see whether adding bags is as effective for other bag types as it was with the plastic bags.
You could also try this experiment with paper towels. See how much weight you can put on one paper towel before it rips through, and then try it with two, three, and four paper towels. You can tell your parents which paper towel brands are really the toughest!
science fair projects

Source:  http://sciencefair.math.iit.edu/projects/bagstrength/

science fair projects guid

kitchen waste biogas
Contact for Homemade kitchen waste biogas plant Projects
science fair projects
Free Winning Science Fair Projects Step-by-Step How-To-Do Resources Ideas, Urdu

It appears that not anything strikes fear in the hearts of students and parents like these three words: science fair project. But it doesn’t have to be that way. A science fair project is an chance to research and learn about things that notice you. And through your studies you will learn how science is essential to everything around us. You will advantage beyond your improved science knowledge. Science fair projects teach you problem-solving skills, improve your written and oral communication skills and give you the satisfaction of completing a well-done project. The ideas for projects are endless; you are limited only by your imagination. For example, does dirty dish water affect the growth of plants? Or how does acid rain affect plant growth? Which diapers are the most absorbent? What is the pH of various shampoos? Do different brands of gasoline make a difference in gas mileage? The first key to…

Friday, 9 March 2012

How You can Make a Rubber Band Helicopter

How You can Make a Rubber Band Helicopter

Before we move on to the steps, let us throw a glance at the materials you would need before you can get started.
  • A drinking straw
  • A rubber band, 3 inches long
  • A flexible wire about 25 inches long
  • Cotton thread
  • Paper clips
  • Cardboard
  • A piece of paper about 12 inches long
  • Sticking tape or adhesive
Once you are ready with the materials, your helicopter will be ready in 6 simple steps.
 ReadMore

 How You can Make a Rubber Band Helicopter

Solar System Projects for Kids

Solar System Projects for Kids

If you are on the lookout for science fair project ideas, then opt for a solar system project that can introduce your child to the astronomical wonders of the universe.
Has your kid always showed an interest in the different facts about the solar system? Then why not give this interest impetus by working together on a solar system project. Choosing one of the many options for solar system projects for kids for a science fair will keep his interest alive and also help him learn more about the different celestial bodies and planets in the solar system.

Solar System Projects

Astronomy is an extremely fascinating subject and it is important that you introduce your kid to this science at an early age so that he learns more about different celestial bodies. Studying the solar system is always the most amount of fun if you make a model of the sun and the planets in their axis. Making a model of a solar system at home is not very difficult and can in fact be a lot of fun. All you need to do is use some objects that are easily available at any stationery shop and recreate the solar system. Given below are the instructions that you will need in order to make a model of the solar system.

Things You Need

  • Foam balls (in different sizes according to scaled measurement)
  • Acrylic paints
  • Tin pie plate
  • Wire
  • Glue
  • Cardboard
  • Scissors
  • Swiss army knife
  • Pencil
Instructions

  • In order to make a model of a solar system, you will need an image of the same as reference. Designate each foam ball to one planet depending on their size.
  • The next step is to paint the foam balls in different colors, depending on the planet/ celestial body they represent. Therefore, Mars would be painted red and Earth would be painted blue and green.
  • Next place the planets in order, according to their distance from the Sun. This step will finish the prep work that you need to do in order to create a model of a solar system.
  • Next you will need to create a ring for Saturn. Use the cardboard to cut out a ring with a diameter slightly larger than the diameter of the foam ball that represents Saturn.
  • Now take the ring and slide the foam ball representing Saturn inside it. Stick the ring to the planet around the center. Paint the ring in a color that resembles the color of the actual ring around the planet Saturn.
  • Now take the wire and cut it into nine parts - one for each of the planets and one for the Sun.
  • Thread the pieces of wire through the foam balls. Once you thread it, bend the end of the wire so that the foam balls do not slip out.
  • The top portion of the wire needs to be spiraled which can be done using a pencil. First wrap the wire around the pencil and then remove it create spirals.
  • Now comes the part of attaching the planets and the sun to the tin pie plate. For this you will need to use a Swiss army knife to create holes through which the wires can be suspended.
  • Start from the middle of the tin pie plate suspending the Sun first, so that you can get your dimensions and distances right.
  • Once you have suspended all the planets, you have created your solar system model. Now just paint a background for it on a chart paper and hang it front of this background.
When you think of ideas for solar system projects, the first image that crops into your mind is that of a model of the solar system. While this is definitely the best option for a science fair project on solar systems, it is also generally the most common one. Now that you know how to make a solar system, you can opt to choose from the multitude of options for easy solar system projects. You can use these to teach them about the different aspects of the solar system and the galaxy.

Ideas for Solar System Projects
1 You could opt to concentrate on the constellations in the solar system for your child's project. If you do decide on this option for a solar system project, you will need to help the child recreate the constellations on a poster board after observation of the sky on a clear night. In order to identify the constellations correctly, he will need a sky map. Get him to first recreate his observations on a poster board and then duplicate this with more clarity on another board for the science fair.
2 If your child has shown a deep interest in astronomy, and celestial bodies, then you could also opt to recreate the different phases of the Moon. Before you move on to such a project ensure that your child understands the solar system as a whole. This is one of those solar system projects that will need you to observe the Moon in all its phases. This will need time. If you do not have time on your hand, then you could try and explain the phenomenon to your kid with the help of a lamp that has had its lampshade removed. Use a small ball to represent the moon and let your child's head represent planet Earth. Let the ball slowly revolve around Earth and ask your child to note down the parts which are reflecting light. Try and explain to your child, the different phases of the Moon. For the science fair project, you can create a working model using a lamp, a ball to represent Moon, and another bigger ball to represent Earth.
3 Other solar system projects include helping them learn how to scale down actual measurements to distances that they can easily understand. You could also decide to study the topography of other planets in the solar system. Planets like Mars and Venus which have been studied by astronomers and scientists are your best bet. You could also create models to understand the surface geography of Earth's natural satellite, Moon.

This are some of the easiest solar system projects. It can be made easily with hardly any help. It is also possible to create 3D solar system projects for kids by using the various kits that are available in the market. These kits which are available for all ages only need you to assemble the parts given to create a solar system model. Solar system projects are a great method of introducing children to the wonders of the universe and the basic concepts of astronomy. 
Source:http://www.buzzle.com/articles/solar-system-projects-for-kids.html

Tuesday, 6 March 2012

Mamaroneck Avenue School's Annual Science Fair

Mamaroneck Avenue School's Annual Science Fair video


The Mamaroneck Avenue School PTA has been holding its annual fourth and fifth grade science fair for about a decade, offering students the chance to strut their scientific stuff.
This year’s fair has one more showing Tuesday night at 6:30 p.m. to 7:30 p.m. in the Mamaroneck Avenue Elementary School gym, where more than 100 students worked alone or in groups to create about 70 science projects.
The PTA offers an initial research session for students where they have access to a computer to investigate their projects. Students then give a one and two minute presentation on the project, and are given poster board to create a project display.
The PTA aims to get all children involved, even those who may get less school support from home, by sending lots of information on the fair in both English and Spanish.
They hope that as many students as possible participate, and that their parents attend the fair to see how projects are done, and how a students and their parent can improve future projects.
The PTA relies on volunteers to help run the annual event, if you are interested in joining the PTA click here for the MAS PTA website, which also has infomration in Spanish.


Science Fair Project Recycled Robot


So somewhat backwards in the process, we had to help guide her toward the scientific method and how she needed to use her project to answer a question.

The question she came up with was.

(State the Problem) 
What will inventors do in the future if we run out of new materials?


(Gather Information)
To gather information she did some research on her favorite inventor Thomas Edison and what sorts of materials he used for his inventions.  She discovered that he many times used old things to make new things. She also found a book about robots from the library where she also learned that many times old parts had to be used to make new robots. She researched robots and the jobs they do. She also had do do research on the human hand and how to make a simple robotic hand that opens and closes.

(Form a Hypothesis)
She then formed her hypothesis of:

I think I can build a robot using only used materials.

(Experiment)
Thus the Recycled Robot was born...
(Insert weird crazy Dr. Frankenstein laugh here.)

Materials used:
Scrap wood -legs and wheels
Broken Home Depot Kids Workshop Project- Hips
Empty kitty litter container- torso
Broken Kids Soccer Goal- arms and shoulders
Empty bakery container- head
Cereal box- hand outline
Used drinking straws (yes she made us use them first)- finger structures
Yellow t-shirt strips pulled into yarn string- tendons in hand and arm.
Empty marker tube- wrist tunnel
Various nails, washers and eye bolts otherwise headed to the trash, from Grandma Bauer's garage when she moved out.
Duct tape
Glue gun sticks.

(Form a Conclusion)
Her conclusion was that you have to use a mix of old and new materials in order to build a robot, because she was unable to reused old glue, or old tape.


More about her process.
She wanted the robot to perform a task after talking to a family friend of mine and discovering that a robot is a machine that performs a job.
She had to keep things simple and used simple machines like a pulley and a lever instead of electronic parts and pieces in order to keep the project on a level she was capable of completing at the age of 6 and so that she could still try to stay within her parameters of building it out of only used materials.


With some supervision and help, because I was not about ready to let my 6 year old search the Internet by herself, she did some research on robotic hands and how they open and close. She then found a few examples of simple robot hands online and used the ideas to make her robot hands function the way she wanted them to.


The hands she ended up with are a bit different than the ones she found so you could tell she used the ideas she saw and made them her own.
She has had some experience using a low temp glue gun before so she went to town.

Any power tools used in the project she did use, but only under strict supervision and guidance from her father, or myself. She would tell us what she was trying to do and how she wanted to do it. We would suggest ways that it might make it work better or stronger and helped line up the holes before she drilled them.

We do have a lot of junk in the basement, the kids have their own tool bench and we keep it well stocked with scrap wood from building projects we have done. They have their own set of simple tools, but are not allowed to use power tools without an adult. She was able to find what she needed at our house.

Even the display, she wanted to keep with the recycling theme so she choose to use cardboard from a box for the back and magazines and newspaper to decorate it.

The robot construction was worked on various times but took a total of about 4 days worth of work, for 30 min to an hour each time.
The display and work took around 3 hours to complete total. It takes a lot of work to type or write all of your findings up when you are only 6.
In the end I was very glad she started super early on her project and could work on it when she was in the mood to do so.
Here is her final recycled robot and how he works to help people have fun while they recycle.


Original Post here http://karascreativeplace.blogspot.com/2012/03/science-fair-project-2012.html

Science Fair Projects Display Boards Pictures

Science Fair Projects Display Boards Photos

Science Fair Projects Display Boards Pictures


Science Fair Projects Display Boards

Science Fair Projects Display Boards

Science Fair Projects Display Boards

Science Fair Projects Display Boards

Science Fair Projects Display Boards

Science Fair Projects Display Boards

Science Fair Projects Display Boards

How to build a Hydroelectric Waterwheel

Original Post by : http://curiositymachine.org
http://curiositymachine.org/sites/all/themes/blueprint/logo.png


 How to build a Hydroelectric Waterwheel 

Learn about hydroelectricity building your own turbine.

Collect

  • Multimeter/Alligator Clips
  • Scissors
  • Straws
  • Wooden Dowel with Drilled End
  • Motor
  • Styrofoam
Iridescent's engineers Aaron and Miriam show different designs made out of simple materials to inspire you to create your own hydroelectric waterwheel model.


How to Build a Submarine

How to Build a Submarine 

Neutral buoyancy! As a Naval Engineer, build a submarine that can navigate out of the surface and underwater.

Original Post by : http://curiositymachine.org
http://curiositymachine.org/sites/all/themes/blueprint/logo.png

 Collect

  • 2 baloons
  • scissors
  • empty water bottle
  • 2 syringes
  • rubber band
  • 2 pieces of plastic tube
Bobby and students from Iridescent's Bronx, NY, studio show you how to be a Naval Engineer and build a submarine out of plastic bottles. The challenge is to reach neutral buoyancy.
Build your own and post your findings into curiositymachine.org, so you get feedback from Iridescent's engineers and win badges!


Related Posts Plugin for WordPress, Blogger...