Share

Showing posts with label chemistry experiment. Show all posts

Sunday, 27 October 2013

Make a Carbon dioxide

Make a Carbon dioxide

Step 1 of 6:

Here's the Materials You'll Need:

Balloon
Funnel
Measuring spoons
Measuring cups
Empty bottle
Baking soda
Vinegar

Step 2 of 6:

Use the funnel to pour 2 teaspoons of baking soda into an empty balloon. Rinse and dry the funnel.

Step 3 of 6:

Use the funnel to pour ¼ cup of vinegar into the bottle.

Step 4 of 6:

Stretch the mouth of the balloon around the bottle top.

Step 5 of 6:

Lift the balloon, letting the baking soda pour into the bottle. Watch what happens!

Step 6 of 6:

When you combined the solid (baking soda) and the liquid (vinegar), the chemical reaction created a gas called carbon dioxide. Carbon dioxide is invisible, except as the bubbles of gas you may have noticed when the vinegar and baking soda mixture began to fizz. This gas is what made the balloon inflate.

Analyze Candy Using Chromatography

Analyze Candy Using Chromatography

Step 1 of 9:

Here's the Materials You'll Need:

At least two kinds of candy-coated sweets (like M&Ms, Reese’s Pieces, Skittles) in the same color(brown works best)
Coffee filters cut into 1” x 3” strips
Toothpicks
Small glasses
Water
Pen

Key Terms Defined

Chromatography
A method for analyzing complex mixtures by separating them into the chemicals from which they are made.

Step 2 of 9:

An adult should complete steps 2 through 4 without letting the children see. Dampen an M&M and make a smudge on a coffee filter strip about a third of the way up. This is the candy evidence that was found at the crime scene.

Step 3 of 9:

Poke a toothpick through the top of the crime scene filter paper. Rest the toothpick on the edge of an empty glass (or hold it) so the filter paper hangs down inside.

Step 4 of 9:

Add enough water to the cup so that it touches the bottom of the crime scene filter paper but does NOT touch the candy smudge. Allow the water to rise up the filter paper, which causes the candy smudge to spread out. This will take a few minutes. Remove the crime scene filter paper from the water and allow it to dry.

Step 5 of 9:

The children can complete the following steps. Write “A” at the top of one of the unused filter papers and “B” at the top of another unused filter paper.

Step 6 of 9:

Dampen an M&M and make a smudge on the “A” coffee filter strip about a third of the way up. Dampen the other candy (Reese’s Pieces, Skittles, etc.) and make a smudge on the “B” coffee filter strip about a third of the way up.

Step 7 of 9:

Poke a toothpick through the top of the filter paper. Rest the toothpick on the edge of an empty glass so the filter paper hangs down inside. Repeat with the other filter paper. Add enough water to each cup so that it touches the bottom of the filter paper but does NOT touch the candy smudge. Allow the water to rise up the filter paper, which causes the candy smudge to spread out. This will take a few minutes.

Step 8 of 9:

Remove the filter papers from the water and allow them to dry. Compare the “A” and “B” filter papers to the crime scene filter paper. Which type of candy was left at the crime scene?

Step 9 of 9:

The dyes used to make colored candy can be made up of several colors. These dyes are composed of different compounds that separate during chromatography. The water rising up the filter paper caused the compounds in the candy to spread out in a spectrum.
Try this – Try this activity with different types of candy, or with candy of different colors. How are the results different?
Source:Museum of Science and Industry, Chicago

Wednesday, 1 May 2013

What happens to gases as they are heated and cooled?


What happens to gases as they are heated and cooled?

Materials needed

  • Narrow necked jar with one whole stopper
  • Balloon stick (available from cart or party supply stores)
  • water

Procedure

1. Put a small amount of water in the bottom of the jar.
2. Insert the plastic tube through the stopper
3. Place the stopper in the jar. The lower and of the tube must be in the water.
4. Notice the water level in the tube.
5. Place the jar in a window in direct sunlight.
6. Check the water level in the tube every three or four minutes for at least one half hour.
7. What happened to the water level as the air warmed in the sunlight? Why?
8. Remove the jar from the sunlight and place it in cool place.
9. Again check the water level in the tube every few minutes.
10. What happened to the water level as the air cooled? Why?
11. What can you say about the effect of temperature change on gases?

For the problems solvers: 

blow up a balloon and measure the distance around it with a string. Mark the string to show the length required to reach around the balloon. Place the balloon over heat vent in front of a heater for a few minutes. Use the same string to measure the distance around the balloon again. Is there a difference? Can you explain why?
Learn what you can about hot balloons. Why do they rise into the air? Why do they come down again? Do balloon pilots usually fly their ships in the cool air of morning or in the heat of the afternoon? Why?

Teacher Information

This activity is very similar to activity 2.11, but this time the changes in water level in the tube are caused by expansion and contraction of air within the jar instead of expansion and contraction of liquid. As the air in the jar warms in the sunlight, it will expand, forcing water up the tube and very likely spilling it out the top of the tube, demonstrating that as the temperature of gas increases, the gas expands. At the air cools, it will contract and the level of the water in the tube will drop.
If food coloring is available, add a few drops to the water to make the water level in the tube more visible. This is a type of thermometer.

What happens to liquids as they are heated and cooled?


What happens to liquids as they are heated and cooled?

Materials needed

  • · Narrow-necked jar with a one whole rubber stopper.
  • Balloon stick (available from craft or party supply stores)
  • · Marker, rubber band, or masking tape
  • · Water

Procedure

1. Fill the jar completely with cold water.
2. Insert the plastic tubing through the rubber stopper.
3. Place the stopper in the jar. As you press the stopper into place, three should be no air space beneath the stopper, and water should be force part way (not more than half way) up the tube above the stopper.
4. Mark the tube at the water level with a marker, or by a putting a rubber band or tape around it.
5. Place the jar in a window in direct sunlight.
6. Check the water level in the tube every few minutes for at least two hours.
7. What happened to the water level as the water warmed in the sunlight?
8. Remove the jar from the sunlight and place it in a cool place.
9. Again check the water level in the tube every few minutes.
10. What happened to the water level as the water cooled?
11. What can you say about the effect of temperature change on liquids?

For problems solvers:

if a motorist goes to the filling station on a hot day and fills the fuel tank clear to the brim, then sparks the vehicle in the sun for two or three hours, sometimes tank will overflow and spill fuel onto the ground. Think about the above activity and see if you can explain why the tank overflows. The manager at your local filling station would probably be glad to discuss to it with you if you have any questions or if you‘d just like to find out if your explanation is correct. Any experienced truck driver could also discuss it with you.

Teacher information

The ideal tube for this activity is a balloon stick, available at party supply outlets.
As the jar of water warms in the sunlight, the water will expand and the water level will expand and the water level will rise in the tube, demonstrating that as the temperature of liquid increases the liquid expands.
As the water cools it will contract, and the level of the water in the tube will drop.
If food coloring is available, have students add a few drops to the drops to the water. This makes the water level in the tube easier to see, and the change is more evident.
This device can become a thermometer if you have students attach a card to the tube and mark the card at different temperatures, by taking temperature readings from a commercial thermometer. Water evaporation in the tube will eventually destroy the accuracy of it as a thermometer and it will need to be re calibrated.
Filling stations store gasoline in large tanks beneath the ground. Thus, the fuel is cool. if a motorist fills the tank, then parks the vehicle in the sun for a time, the fuel will expand from the heat and will sometimes overflow onto the ground.


What happens to solids as they are heated and cooled?

What happens to solids as they are heated and cooled?

Materials needed

  • ·         Wire, about  1 m (1 yd.) long
  •               Large nail or small bolt
  • ·            Candle
  • ·             Match

Procedure

  1.   Wrap one end of the wire around the nail and anchor the other end to a support. Adjust the wire so the nail swings freely but barely missies the table or floor.
      2.       Light the candle and heat the wire. 
      3.       Observe the nail. What happened?
      4.       Remove the candle and allow the wire to cool.          
      5.   Observe the nail. What happened?

6.       What can you say about the effect of heat on solids?

For problems solvers: 

did you ever notice how hard it is to remove the ring from a jar of fruit? Try running hot water over the lid, and then remove it. What do you think makes the difference?
Why are sidewalks made with joints every few feet? See what you can learn about expansion joints. See if you can find expansion joints as you drive across over passes or bridges on the highway. Why are these joints built into the bridge? Try to find expansion joints in large buildings.
If you know an automobile mechanic, ask him or her why wheel bearings are sometimes installed on axles when they are very hot.

How do molecules behave when heated?

How do molecules behave when heated? 

Materials needed

  • Chalk or masking tape

Procedure

1. Have several students stand in a group.
2. Mark a border on the floor around the group with chalk or tape. Leave a few inches between the group and the border all the way around.
3. Ask students to move around slowly. Everyone should move constantly, but no one should move fast and there should be no pushing and shoving. They are to try to stay within the border marked on the floor.
4. Now instruct those in the group to move a bit faster. They are still to try to stay within the border.
5. Continue speeding up the movement of the group until they can no longer remain within the line marked on the floor.
6. Discuss what happened as those in the group increased their speed. Ask how this relates to the movement of molecules as temperature is increased.


Thursday, 19 January 2012

Make Your Own Voltaic cell


Level Elementary, Secondary


We can make an electric cell by using easy available materials. Let’s try it.

Concept

It is Alessandro Volta in Italy who invented the battery for the first time in 1800. That used the zinc and copper plate in the dilute sulfuric acid. This electric cell is a prototype of a dry battery today. Let's make the voltaic cell.


Materials
glass cup or glass bottle, diluted sulphuric acid (battery liquid), zinc plate, copper plate, conducting wire, clip, light emitting diode (LED), and hydrogen peroxide solution

Procedure

  1. The zinc plate and the copper plate are put in the glass cup.
  2. Diluted sulfuric acid is put.
  3. The zinc plate and the copper plate are connected to the conducting wire. Because the voltage is low in one, it connects in series by two
    or more.
  4. It is connected to LED. The bubble of hydrogen attach to the surface of the copper plate soon. It becomes the insulator and the electric current is getting weaker. The bubble can be taken by putting the hydrogen peroxide solution and the current revives.

Science

Volta discovered the ionization tendency while advancing this research.Ionization series to water is below.

Li, K, Ca, Na, Mg, Al, Zn, Fe, Ni, Sn, Pb, (H), Cu, Hg, Ag, Pt, Au

In the voltaic cell, the metal which becomes ion easier than hydrogen is used for n

egative pole. And the metal which is more difficult to become ion than hydrogen is used positive pole.In this battery, zinc melts to sulfuric acid and it becomes a zinc ion.The electron is left for the electrode at this time. This electron flows in the conducting wire and reaches the copper plate. The electron is
given to the hydrogen ion here, and the hydrogen gas is produced.


Questions

Q: Let’s make sure that each combination will make electric current or not.
Source: Chemistry Experiments 

Deoxidation of carbon dioxide

Deoxidation of carbon dioxide

Concept 

When an organic compound burns, carbon dioxide is produced. The property of the carbon dioxide is no combustion. It is used for the gas of extinguisher. Most materials are extinguished in the carbon dioxide gas.
However, magnesium takes oxygen from carbon dioxide and burns. Students are learning that  materials don't burn in carbon dioxide. It could be surpri se for students there is a material that can burn in carbon dioxide.   The concept of oxidation can be easily understood in the usual combustion. Not only oxidation but also eoxidation can be studied  in this experiment.

Materials 
limestone, dilute hydrochloric acid, magnesium ribbon, PET bottle, straw, clay, water, glass vessel, and deflagating spoon

Procedure 
  1. The hole is made in the cap of the PET bottle. The straw is passed through this hole.Surroundings of the hole are shielded with clay.  
  2. The limestone is crushed to the sma ll pieces and is put in the PET bottle. Put some dilute hydrochloric acid and carbon dioxide is produced.
  3. A little water is put in the glass vessel.Carbon dioxide is poured in the glass vessel.The mouth of the glass vessel is covered with paper.  
  4. A small piece of magnesium ribbon is tied to the deflagating spoon. The magnesium ribbon is ignited. Magnesium is put in the carbon dioxide of the glass vessel.   

Science 

Deoxidation of carbon dioxide
The carbon deoxized from carbon dioxide is produced a little in  this reaction.You should carefully obse rve it in the water of the glass vessel. There  are tiny black spots of carbon and the white ash of magnesium oxide in it.
Source: Chemistry Experiments

Wednesday, 18 January 2012

Experiment Split flame

Experiment  Split flame
Combustion

Level Primary, Elementary


Concept 

   It is understood that heat is necessary for burning. It is understood that the candle and alcohol change into the gas by heat and burn.

Experiment  Split flame

Materials


candle, wire gauze (2), and match

Procedure 
  1. Heat is lost when the wire gauze is put in the flame of the candle and the paraffin gas  is not able to be burnt.
  2. It seems that the flame separates when another wire gauze is brought up and ignite the gas.
Source: Chemistry Experiments

Pocket body warmer Experiment Iron and sulphur

Pocket body warmer

Level Elementary

Concept 
   It is confirmed that heat is released in the chemical reaction by oxidization and sulphuration with iron powder.

Experiment  Iron and sulphur

Materials
iron powder, sulphur, mortar, pestle, thermometer, paper, and balance

Procedure 

  1. The iron powder 14g and the sulphur 8g are measured and taken.Put them in the mortar and mix.
  2. Water is put in by two and three drops, and the ball of iron filings and sulphur is made.
  3. The ball is wrapped with the paper, and the thermometer is inserted in the inside.
  4. The tucked ball with the paper is warmed by the palm.Warm it by the palm until the temperature   exceeds 40℃ You put on the desk
  5. afterwards, and observe it.
              heat
Fe + S    →  FeS


More Experiments and projects   

How to find out Oxygen ratio in air by Candle combustion


Water goes up the level 1/5.
How to find out Oxygen ratio in air by Candle combustion

Materials 

candle, glass vessel or PET bottle, match, plate, sodium hydroxide, and water

Procedure 

  1. The sodium hydroxide is dissolved in water and the solution of 3% is made.
  2. The candle is fixed in the plate.
  3. Light the candle.
  4. Cover it with the glass vessel or the PET bottle.
  5. Confirm the water level and the ratio of the volume.

Science 
When burning, the candle uses the oxygen in the air. The water made by burning reduce the volume about 1/1700 after cooling and becoming the liquid. As for remaining carbon dioxide, it reacts with the sodium hydroxide and the sodium carbonate is made. It is absorbed to the solution. Therefore, water which is almost same volume of the oxygen rises in the container.

More Experiments and projects   

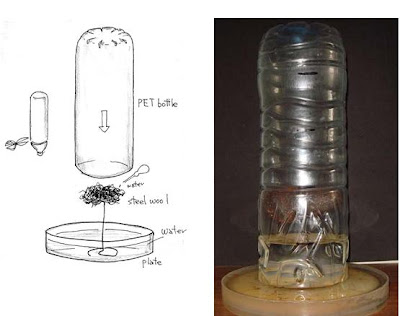
How to find out Oxygen ratio in air


How to find out Oxygen ratio in air

Level Elementary

Concept
The ratio of oxygen in air is 1/5(21%). Let’s confirm it by simple experiments. by Iron rusting

Materials

steel wool, glass vessel or PET bottle, wire, plate and water

Procedure
  1. Make the wire support for the steel wool.
  2. The steel wool is dampened by water a little.
  3. The steel wool is put in the plate.
  4. Water is put in the plate.
  5. When the PET bottle is used, cut it in the form of a cylinder.
  6. Cover the steel wool with the glass vessel or the PET bottle.
  7. Leave it for half a day and confirm the water level and the ratio of the volume.


Science

The oxygen in air combines to iron and makes iron oxide. The gas oxygen is absorbed
in steel wool. Water enters in the container to the same amount of oxygen.

More Experiments and projects   

How to make Hydrogen bubble


How to make Hydrogen bubble
Experiment How to make Hydrogen bubble

Concept 
   The   hydrogen gas is lighter than the air. Let's experiment it by using soap bubbles.

Materials 

PET bottle, straw, clay, zinc, diluted hydrochloric acid, glass, and the liquid detergent

Procedure 

  1. The small hole is made in the cap of the PET  bottle. The straw is passed through the cap. Surrounding of the hole is sealed with clay. 
  2. The liquid detergent is thinned to 20 times by water and the soap bubble liquid is
        made. 
  3. Zinc and diluted hydrochloric acid are put in the PET bottle and the cap is done. 
  4. The straw end is put into the soap liquid. Soap bubbles swell, and these rise in the air. 
How to make Hydrogen bubble
More Experiments and projects 
Related Posts Plugin for WordPress, Blogger...